This article is also published at Medium and dev.to
Have you ever felt wrist pain after long time typing and using a mouse? Yep, I bet you are like many of us, who spends their entire life in coding, it’s inevitable to experience the pain of wrist at some point. Your career is like a marathon, to go far, it’s critical to treat yourself well.
A while back, wrist pain stroked me again, I’ve lost count how many times it is. It made me decide to spend some effort to find out the best ergonomic keyboard and trackpad setup that works for myself. After I did my research and bought the keyboard, while exploring the right keyboard layout configuration, I noticed that with the customizable layout, I can design a layout that makes Vim mode like debugging experience that I’ve been dreaming for a long time. As a result, it boosts the speed of tracing code by orders of magnitude. Basically, it makes you debug like a ninja.
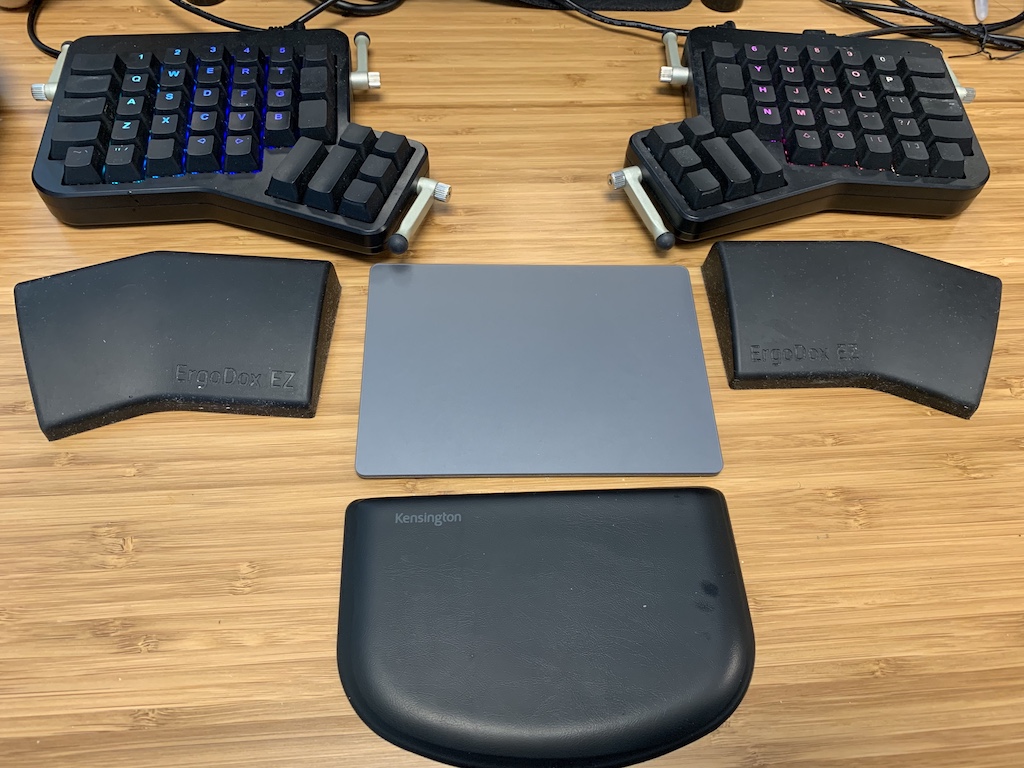
So in the end, I not only feel more comfortable when working with a computer but also become more productive. Sounds too good to be true? Read on, today I would like to share the experience of my keyboard, its layout, and trackpad setup with you. Before we jump into the article, let’s what it looks like:
My setup
First thing first, this article is not sponsored by any vendor, I am buying all these equipment myself. I am just here to share my own experience, it works for me, but your mileage may vary.
Okay, now back to my setup, the keyboard I am using is ErgoDox EZ Glow, with backlit and Kailh Copper switches. I also bought their wrist rest. The buying decision was mostly based on online research and a few bullet points:
- Need to be ergonomic
- Split design, more natural way to type
- Never compromise productivity
I also referenced a few reviews on the internet, like this one from Linus Tech Tips
I bought it because it fits most of my needs, and I also like its design. The keyboard is reasonably configurable with different options like you can choose between Glow and Shine, one is glowing below keycaps, another is glowing at the back of the keyboard. You can also choose to include a tilt kit or not, I didn’t find it useful to me eventually, but I think it’s still nice to have the option. And of course, keycaps and switches are also an available option. I think one of the best parts of this keyboard, it’s open-sourced, so if you have time, you can buy materials online and assemble one by yourself. You can see how other people build it here.
For the trackpad, I use Apple’s Magic Trackpad 2. The buying decision is mostly based on:
- Suffered a lot from long-time mouse use before
- I feel comfortable with my MacBook trackpad
- Gets used to and love MacBook trackpad gestures
I know there is vertical or trackball mouse, but I realized that I basically just want to replicate the MacBook trackpad experience, so I didn’t spend too much effort doing research and end up directly buying the Magic Trackpad. Why does trackpad work for me? I am not an ergonomic expert, but as far as I know, the reason people suffer from mouse use is that the arm is twisted when holding the mouse.
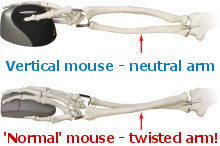
I guess the reason why using trackpad is not as painful as a mouse for me is because, over time, I have trained myself to use trackpad like using a vertical mouse. I rotate my arm out a bit, use middle finger or ring finger to move and scroll around most of the time so that the arm is not twisted.
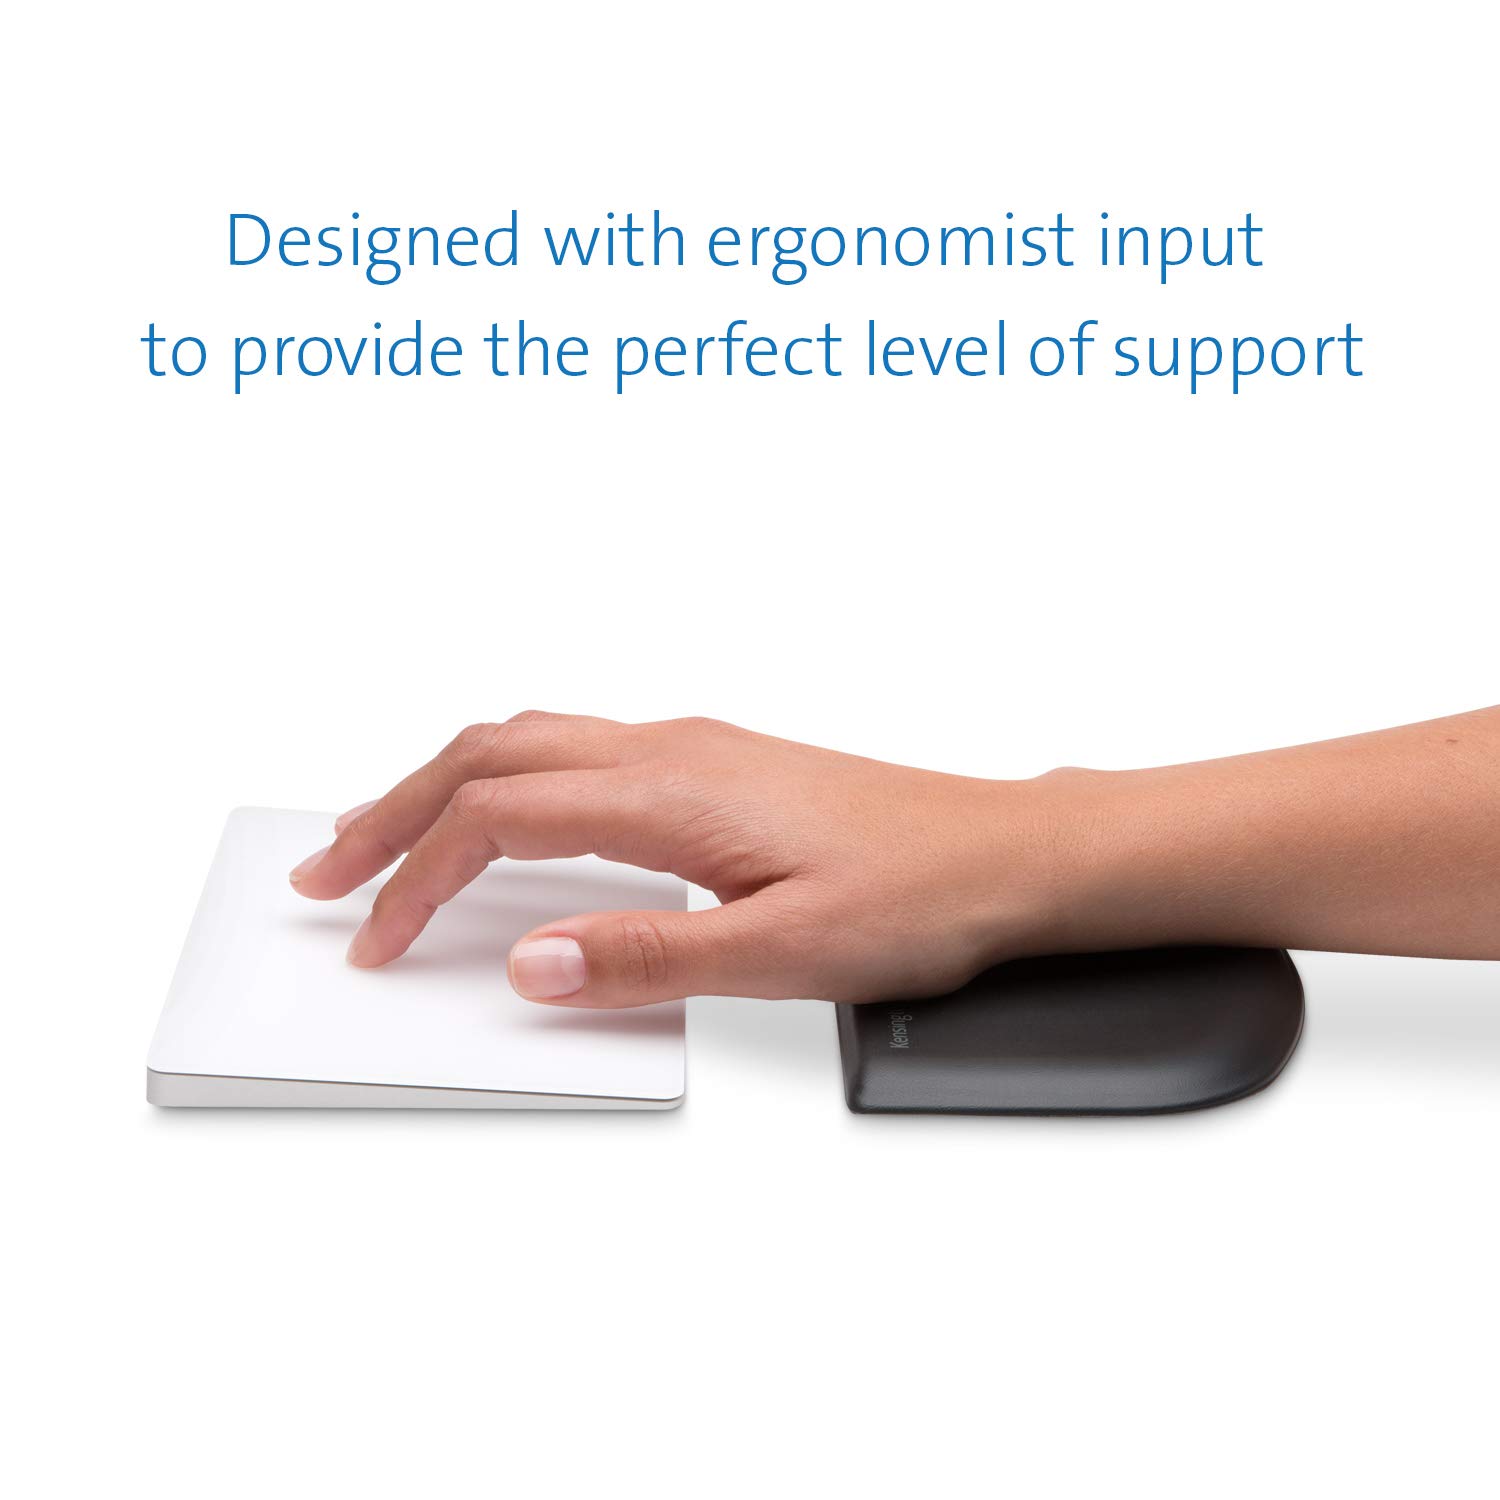
While trackpad is excellent, but it’s still uncomfortable if my wrist has no place to reset. As you can see from my setup photo, I also bought a Kensington ErgoSoft Wrist Rest for Slim Mouse/Trackpad then my wrist can rest on it.
These two combined are a bit expensive. Here’s what they cost:
- ErgoDox EZ Glow: $299.00
- ErgoDox EZ Wrist Rest: $30.00
- Tilt Kit: $25.00
- Apple Magic Trackpad 2 - Space Gray: $149.00
- Kensington ErgoSoft Wrist Rest: $10.90
That’s $513.90 in total, definitely not cheap, however, so far, it has been almost one year since I started, I haven’t felt any discomfort. Considering how much medical bill cost can be avoided in the future, personally, I think it’s totally worth it.
Relearn how to type like a baby
The drawback of using a keyboard like ErgoDox is, I’ve never used an ortholinear and split keyboard previously, I need to relearn how to type like a baby. For the first week, I was mostly struggling to find where is the key I want, or keep pressing wrong keys, like it’s really easy to mix X and C together. To overcome it, I need to suppress my desire of typing quickly to finish my current task. I have to force myself to keep using it. I also did some practice with online typing exercise.
After one week, I get more used to it, but I realized that the default keyboard layout is not ideal for me. I found it challenging to do certain things I want to do. Then I keep writing down things I want to improve in a todo list and keep adjusting the layout. And eventually get to a point I barely change the layer 0 (the major keyboard layout), and it looks like this:
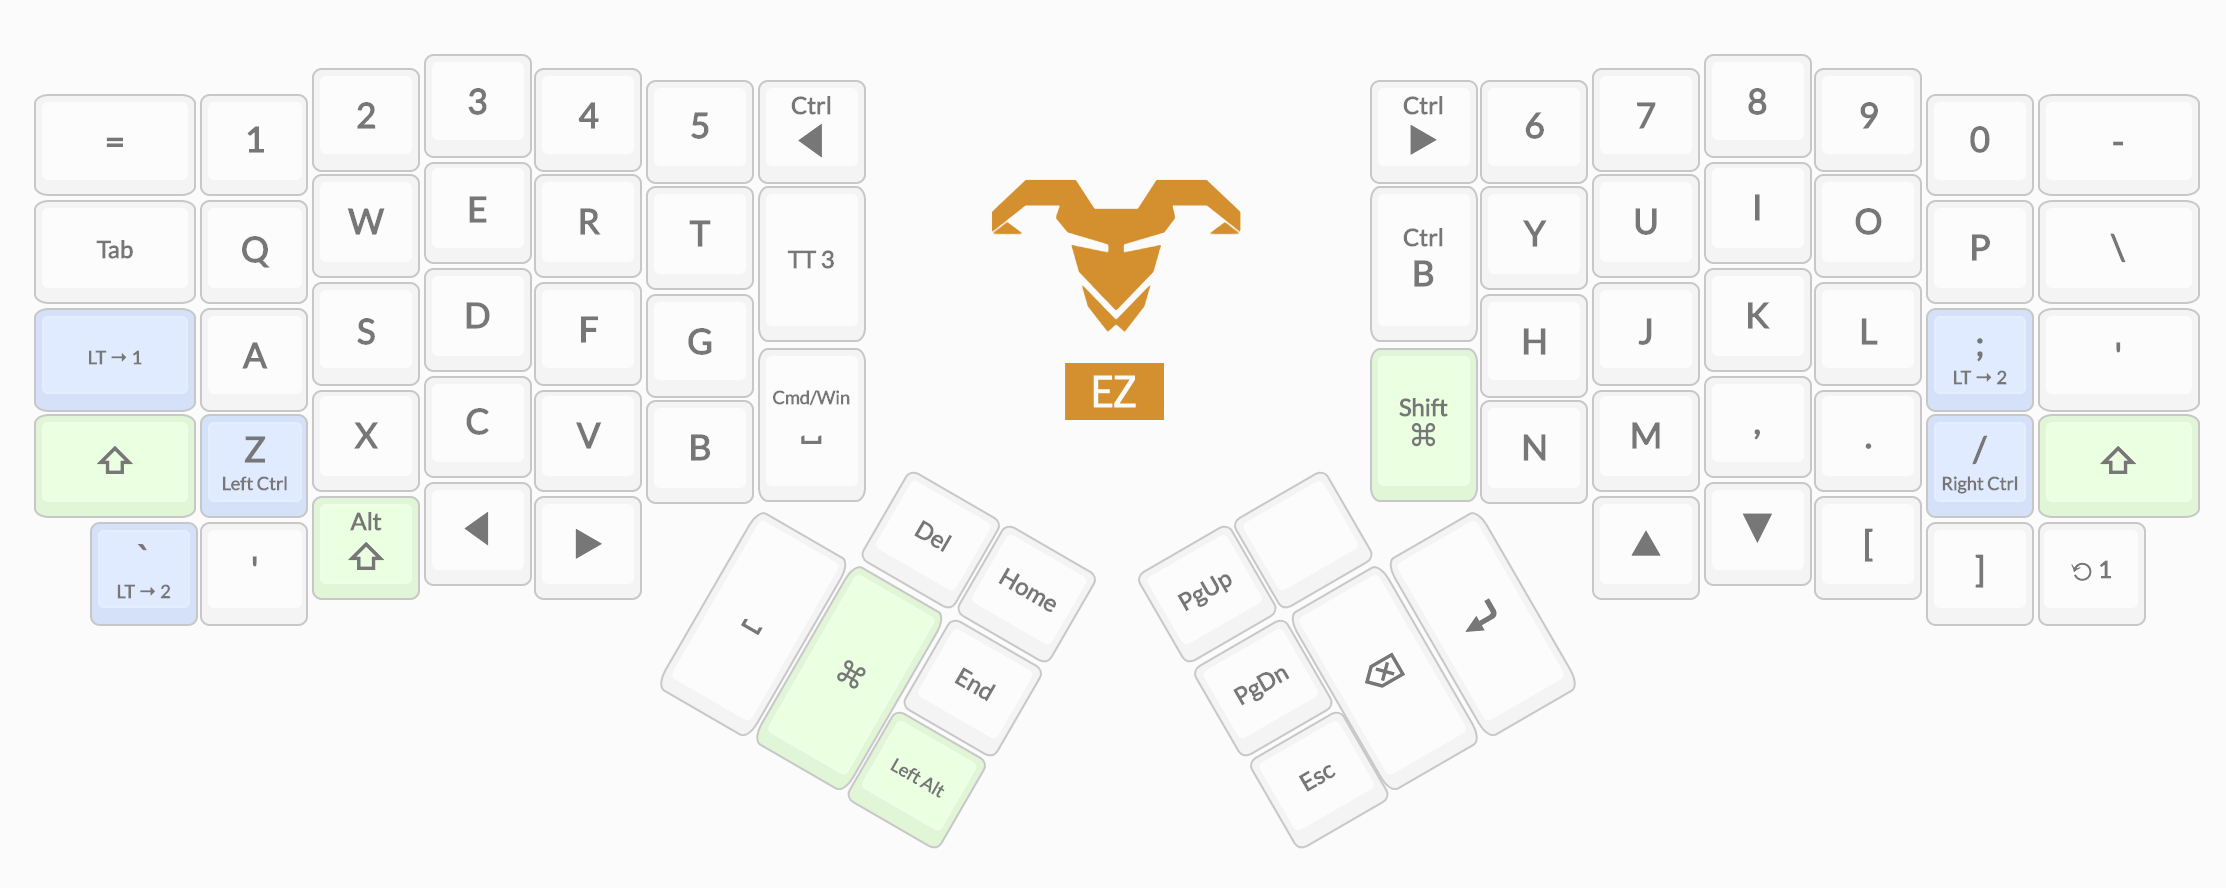
You can check out my layout here. After my layout is more stable, I can then type as fast as with a traditional keyboard.
The CLion layout
The most exciting part of designing your own layout is, it’s super powerful to build one for the tool you use daily and thus can boost the productivity by orders of magnitude. A good example would be my CLion layer:
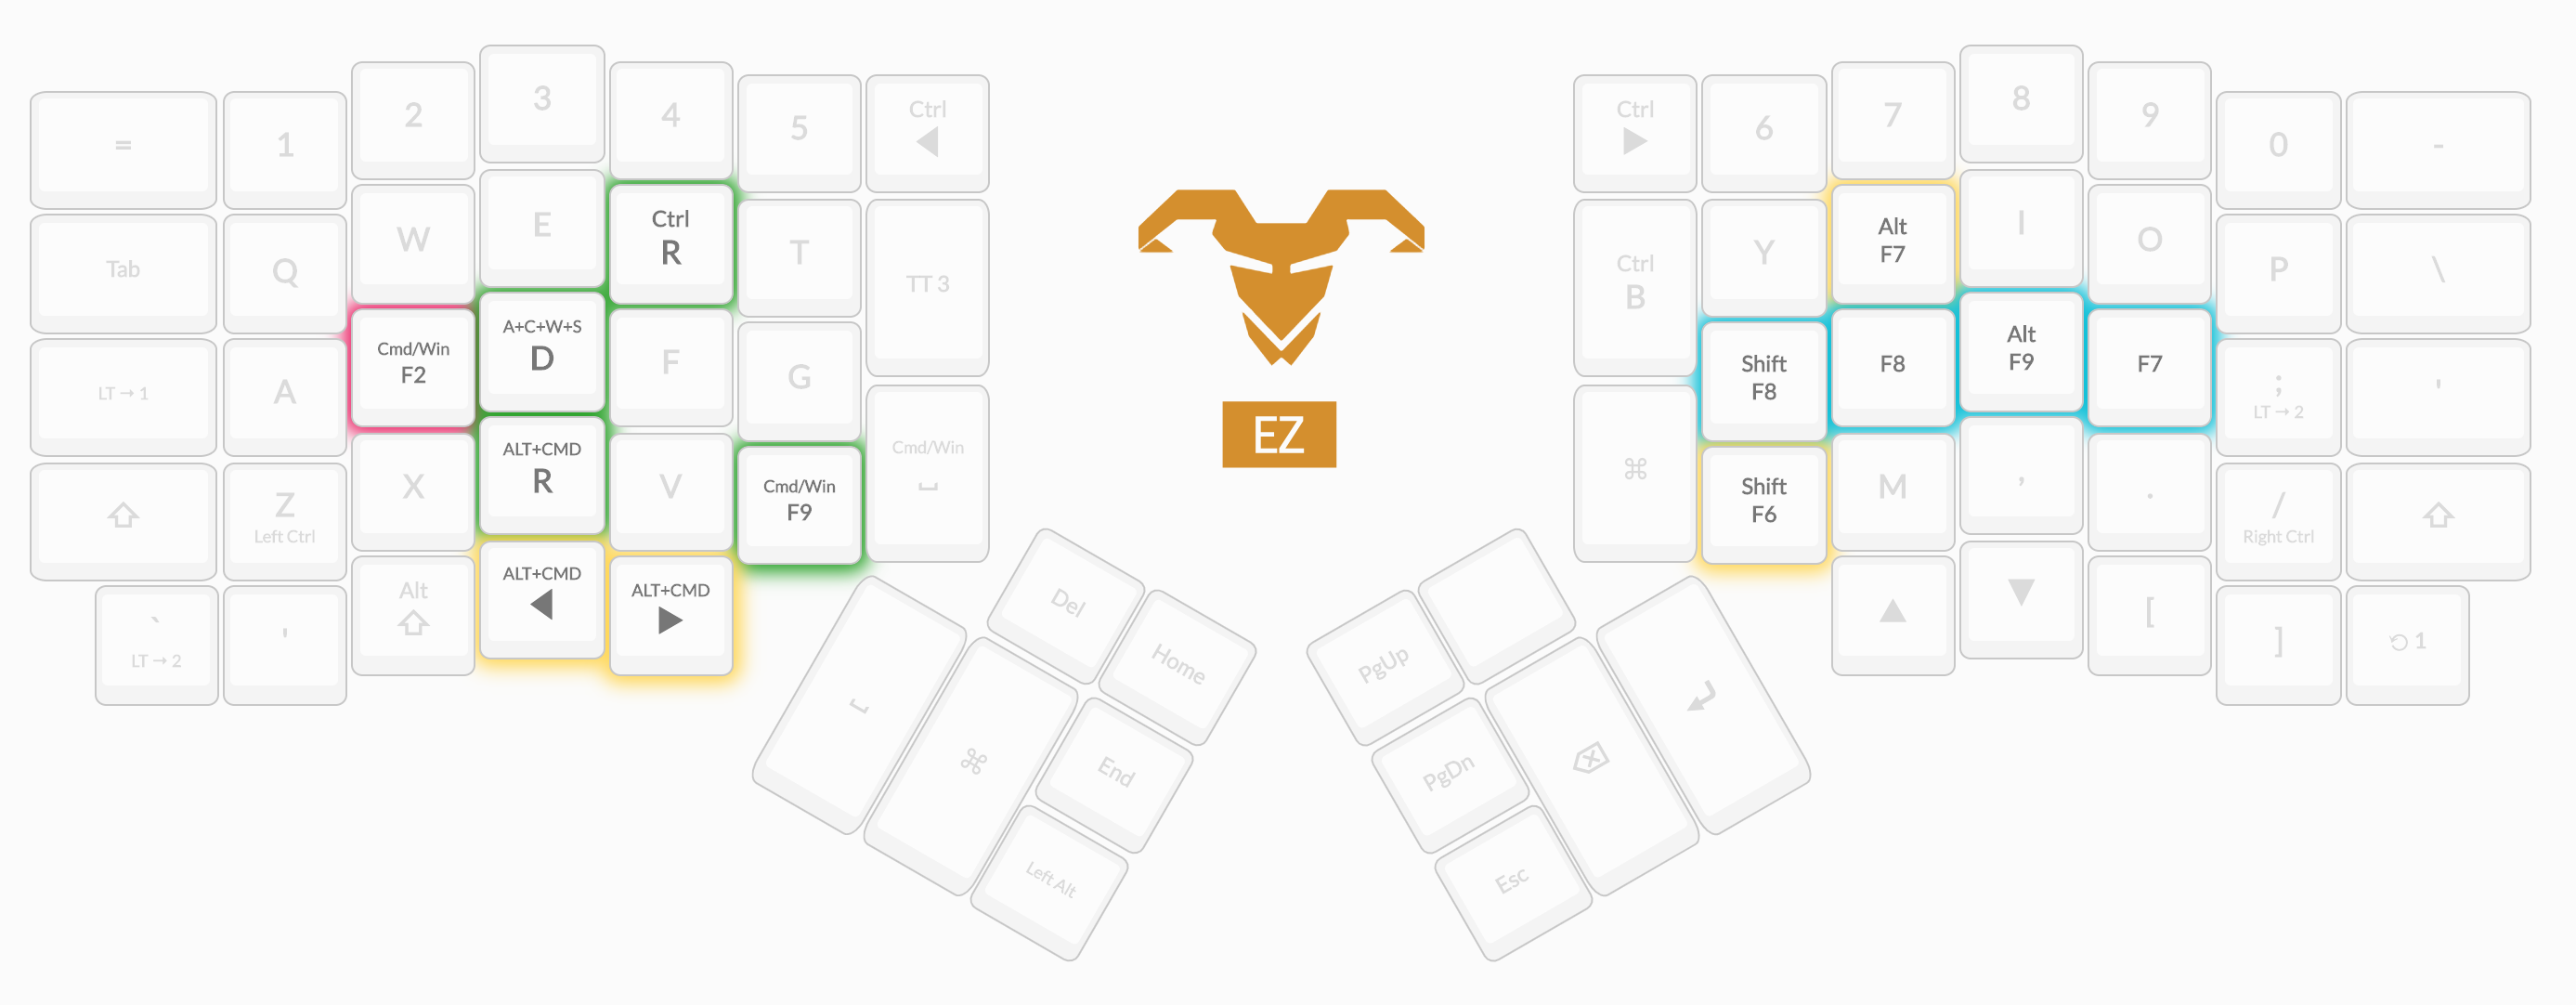
For people never use ErgoDox or customizable keyboards, a layer means a keyboard layout which you can switch on and off. I need to write a lot of C++ for my current job, and I use CLion. From time to time, I need to use a debugger to track into the code find out why the program crashes or figure out how particular piece of code works. I never find it easy to use the default debugger shortcuts for any IDE.
Uh…, okay step into is Alt + F9, next line F8. Wait, why is that?
It’s tough to remember which key is for what. And different IDE has different shortcuts, they all don’t make any logical sense. So I usually end up clicking on the buttons on screen. I know it’s possible to change the shortcuts, but it means I will need to remove some default shortcuts to make room for logical shortcut layout. Also, I will need to maintain the same configuration across many IDEs, like IntelliJ and PyCharm, which will be a pain in the ass.
I am a Vim user, I navigate via HJKL keys in editors. I like the Vim navigation experience, and I thought it would be wonderful if you can debug like using Vim. In fact, I built a web-based Python debugger prototype that uses Vim style shortcut previously, and I felt it’s way better debugging experience. Why it’s better? Well, because it’s more intuitive. Let’s see each key and what they are for now
H: ⬅️in Vim, I am not interested in the function anymore, let’s jump outJ: ⬇️in Vim, go down, step over to next lineK: ⬆️️in Vim, well, there’s no step back in CLion debugger, so I made it step until current cursorL: ➡️️in Vim, to know what’s going on in the function, step into the function
Now, as you can see, it’s fairly easy to debug like navigating in the code with Vim. The only less intuitive key is K, as the only IDE debugger I knew supporting step backward is Visual Studio Code, CLion doesn’t support it. I just want to make it something anyway, so I made it step until current cursor. You can remember it like this
Step until the cursor, so it’s up
Since I started using this new debugging layout, the code tracking speed went up many times as now I can focus on the flow of program instead of which key I should press. Besides debugging shortcuts, I also added many commonly used shortcuts in the layout, such as
R: Run the programD: Debug the programC: Resume running program when debugging (continue)S: Stop running programU: Find all usage of a symbolN: Rename symbol
These keys all come pretty handy and intuitive, at least to me. And despite that I made this layout for CLion, since other JetBrains IDEs are using mostly the same shortcut by default, I can also use the same layout in IntelliJ when writing Java and PyCharm when writing Python without a problem.
The CLion layout is just one example. I also added a few keys for the common applications I used daily, such as keys for navigating between iTerm2 split panel. And it truly made my life easier.
Finally
I am really glad I spent my time to find the right setup for myself. Now not only I feel more comfortable but also more productive. And I think the ability of customizable keyboard layout is super powerful. The way I use it probably only scratch the surface of it. There’s way more customization can be done to boost productivity for different applications. I am curious to see other people’s smart design. What is your keyboard layout? If you are also using a customizable keyboard, why not leave a comment below and share your awesome design! 😄