Have you ever wondered while browsing the internet whether the video or image you’re viewing is real or AI-generated? People say, “Seeing is believing,” but that’s less true in the AI era. Nowadays, generating photorealistic videos with audio is easier and cheaper than ever.
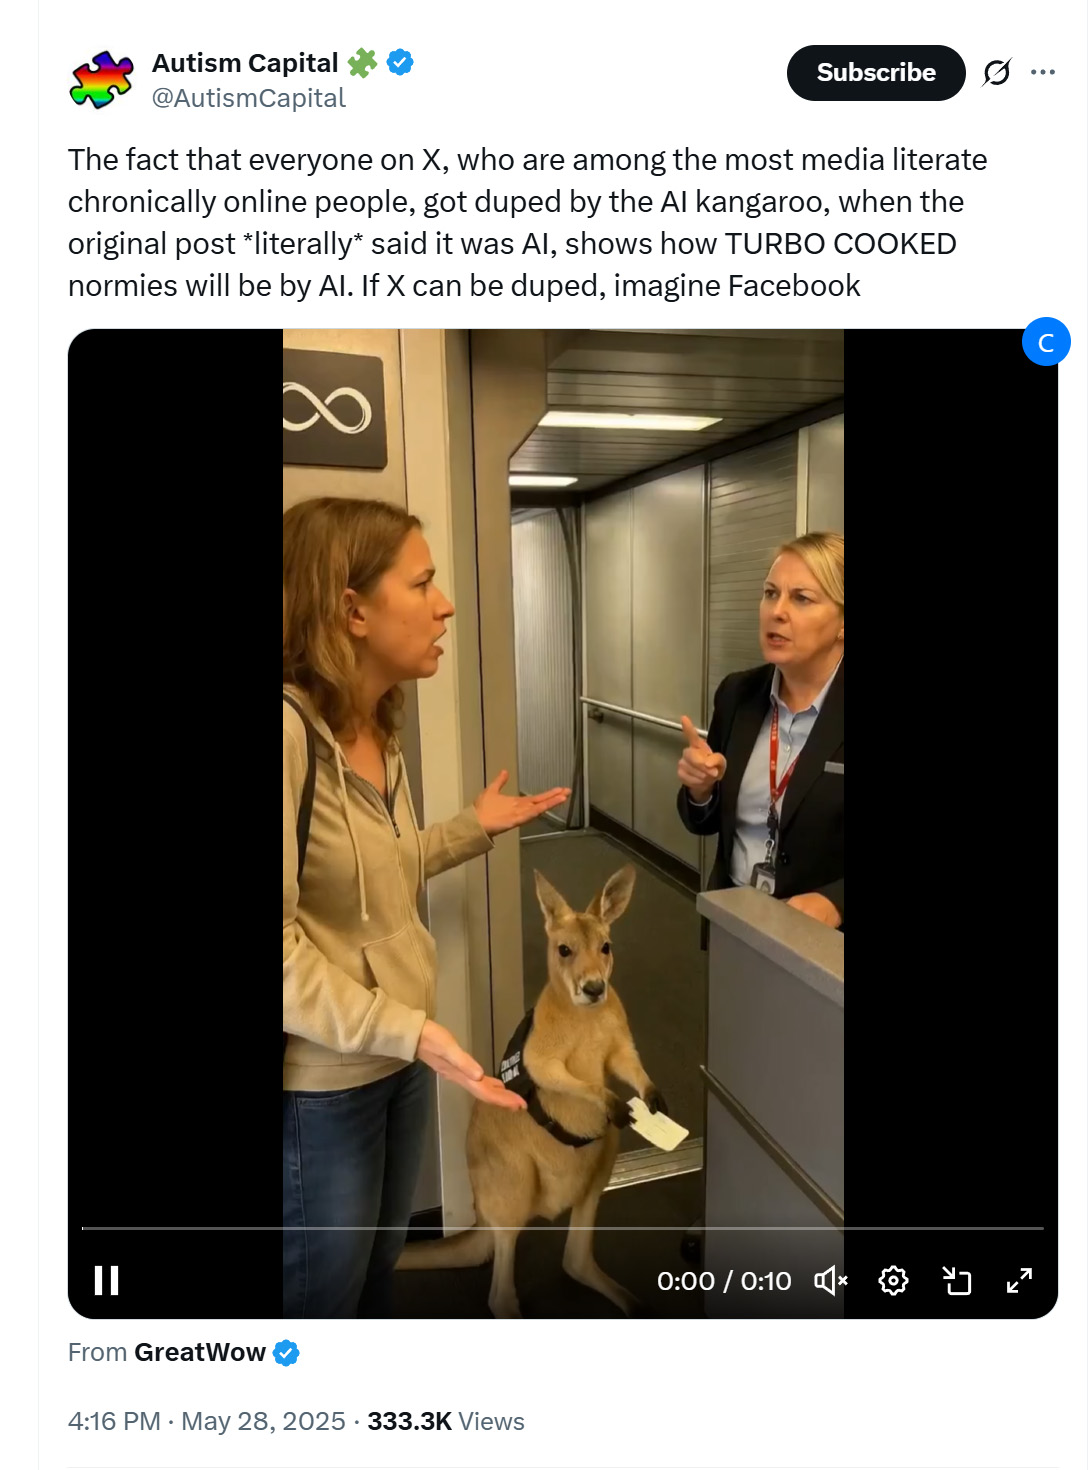
If you’ve followed trends on X, you may have noticed many users liked and reposted a video of a kangaroo being denied boarding on an airplane as an emotional support animal, ticket in paw. As adorable as it was, the video was AI-generated. The ticket’s text is gibberish. I call it “AI fonts.” I’m no linguistics expert, but the verbal exchange also felt off.
I’ve faced the same issue. While browsing X, I’ve retweeted content, only to later realize it was AI-generated, which was embarrassing. I wished for an easy-to-use tool to distinguish AI-generated content from real content. I tested several online tools claiming to detect AI-generated content, but none worked as expected. So, I spent the past month training a model and building a browser extension focused on detecting AI-generated videos on X. I named it CakeLens, inspired by the viral “Is it a cake?” videos. Instead of identifying cakes, it detects AI-generated content. I chose the name because I wanted it to be as easy as “a piece of cake” to use.
CakeLens is now available on the Chrome Web Store. You need to sign up for an account at CakeLens.ai to use it. Once set up, a button appears in the upper-right corner of videos on X when you hover over them. Click it to submit the video for AI-generated content detection.
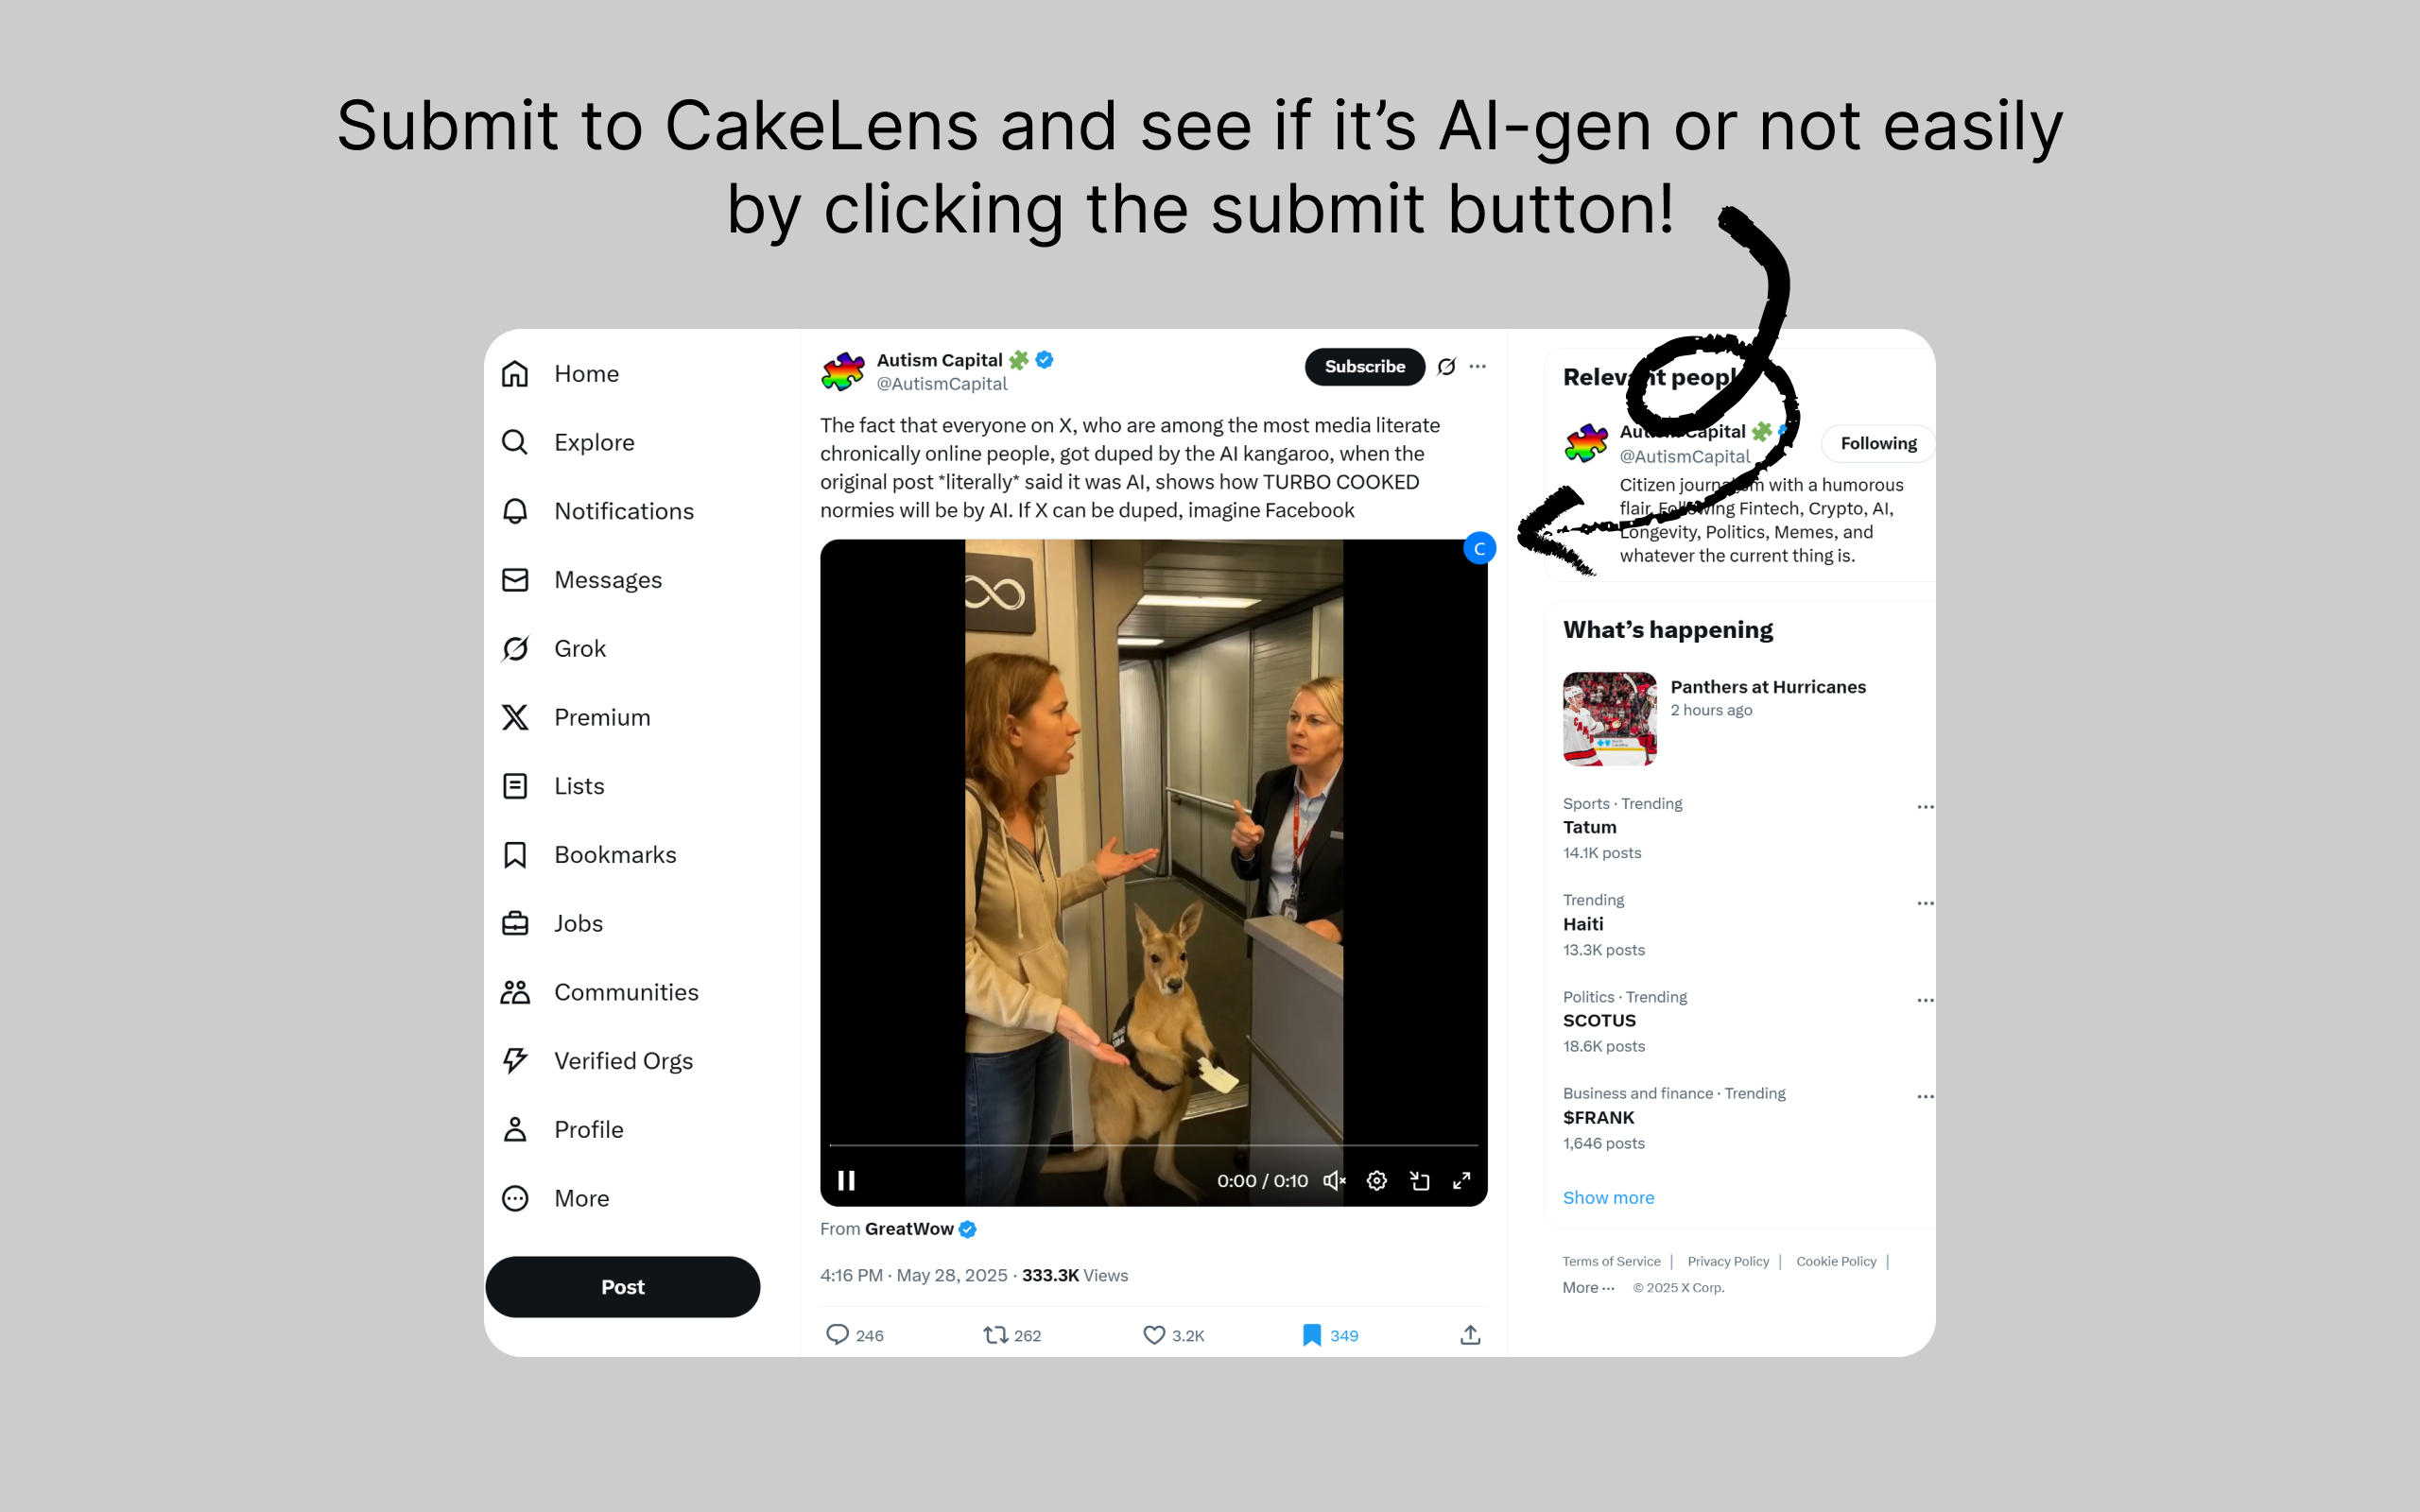
Screenshot of X.com showing the CakeLens button on the upper-right corner when hovering on a video
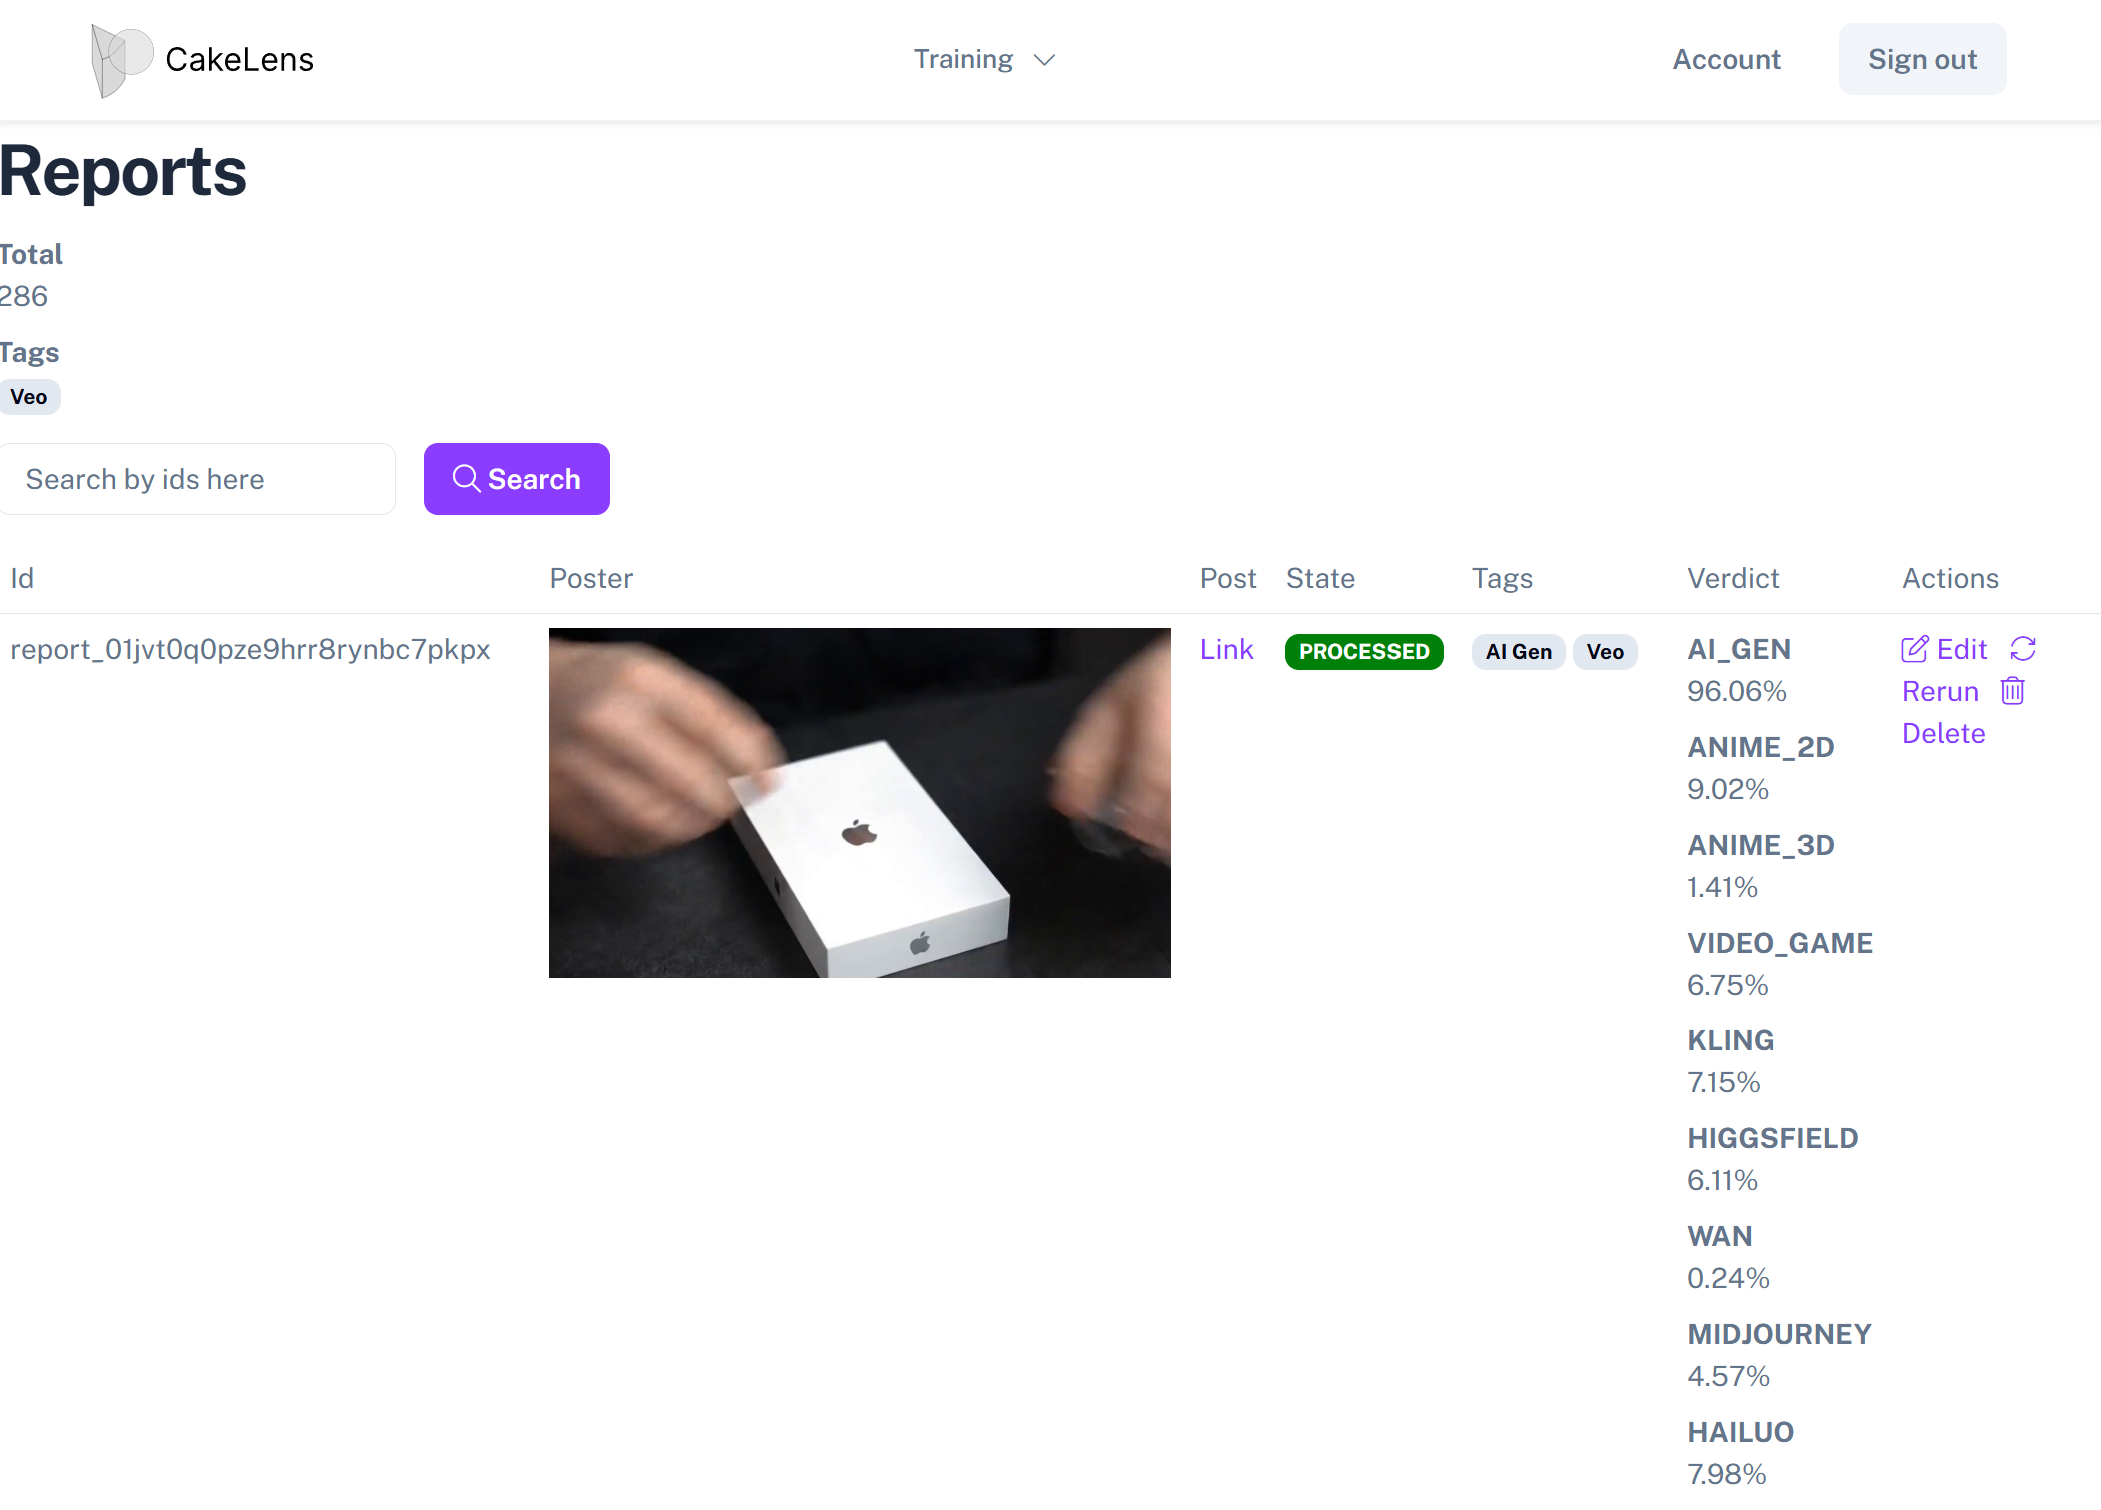
View the detection results on the submissions page of your CakeLens account.
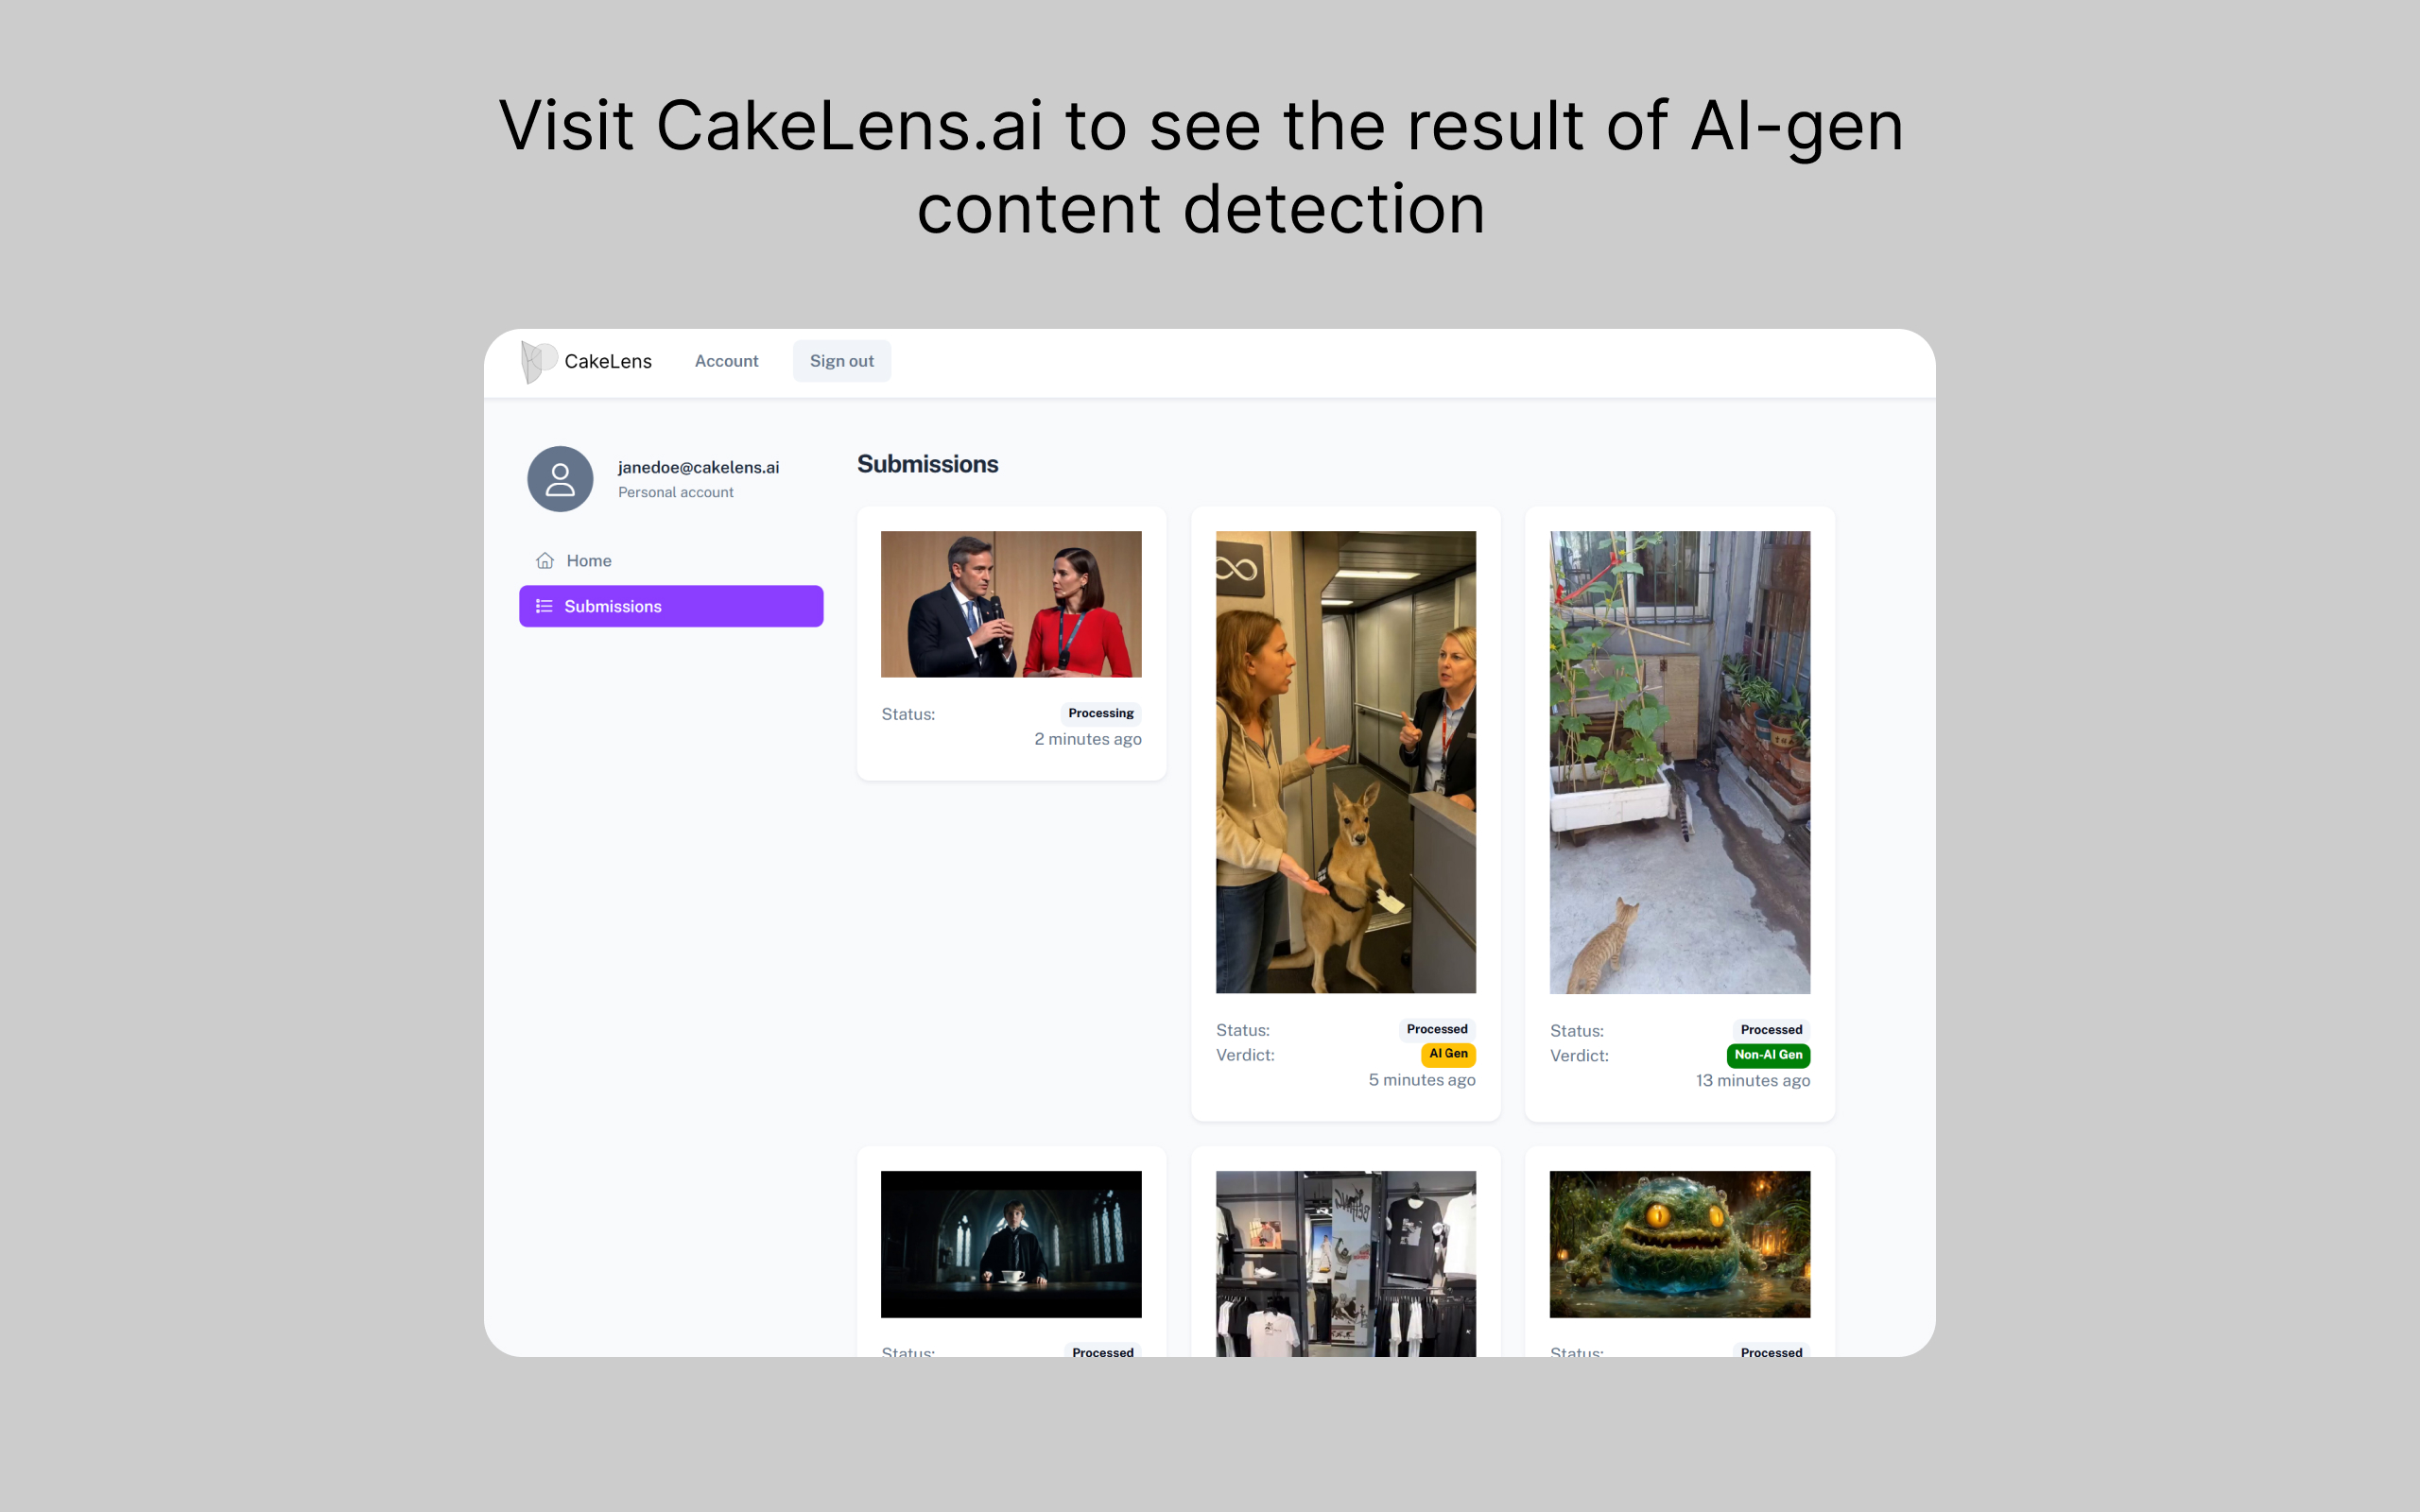
Screenshot of the submission page of CakeLens
The latest version of my model achieves 77% precision and 74% recall on the validation dataset at 50% as the threshold.
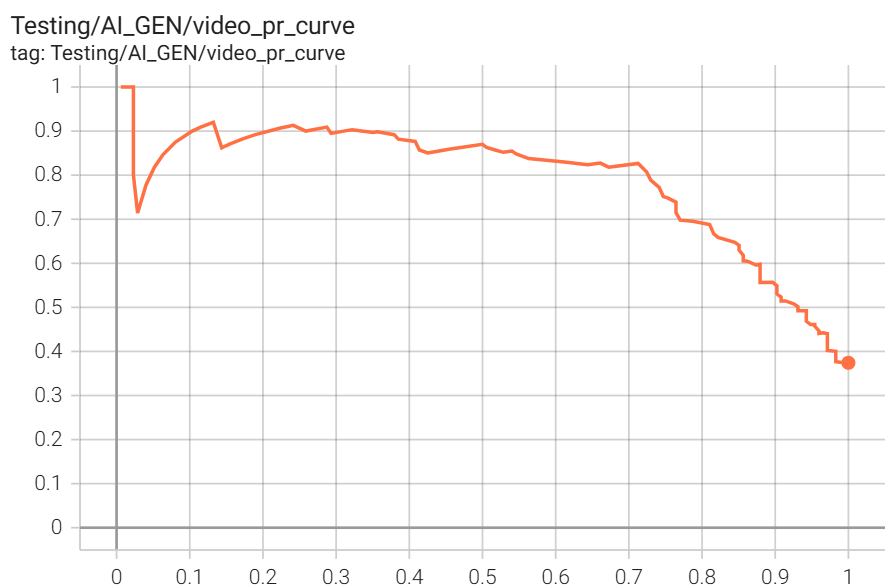
Screenshot of TensorBoard PR curve for CakeLens' latest model
I’ve learned a lot from this project. Today, I’m sharing what I’ve learned from building this pet project!
Why I Built It
Two months ago, I saw a post on X that upset me.

X post video showing Myanmar earthquake turns out to be likely AI-gen
It frustrates me that while people suffer from disasters, a few uses AI tools to create fake videos for attention. Most AI-generated content is created for positive purposes, like art, which I support. However, what prevents bad actors from using these tools for scams or propaganda? As AI-generated content grows, so will its misuse. I don’t believe governments should ban new technologies due to potential misuse. Although most AI generation providers build safety mechanisms into their systems to prevent common misuse cases, AI technologies will only become more prevalent. Sooner or later, everyone will have access to these tools, so it’s not meaningful to focus solely on restricting them from the tool side.
Instead of stopping users from misusing it, I believe in fighting technology with technology—like beating magic with magic. That’s when I decided to build CakeLens. Additionally, I recently built a feature using large language models (LLMs) for BeanHub. However, I feel less comfortable as an engineer when using new technology without understanding the fundamentals. For example, I wrote an article titled Elliptic Curve Cryptography Explained to understand ECC before using it at work, because I don’t like treating it as a mystical black box. Using LLMs or other machine learning technologies is similar; it’s easy, and anyone who knows how to call an API can do it. But what about data collection, labeling, training, and inference from the ground up? This pet project became my deliberate practice in machine learning, as it gives me a chance to build it from end to end.
Building the Chrome Extension
I envisioned CakeLens as a Chrome extension to automatically label AI-generated content on web pages you browse, similar to an antivirus scanning for viruses but targeting AI-generated content instead. While this idea sounds appealing, it’s impractical for several reasons. The internet has too much content to scan everything affordably, and users may not care if a cute cat video is AI-generated. Privacy is another concern. Detecting AI-generated content requires significant computing resources, likely on a server, which could resemble tracking user browsing activity. I wasn’t comfortable with that. To balance functionality and privacy, I made a compromise.
Instead of scanning all content automatically, CakeLens only analyzes content when users request it. Since popular AI-generated content often sparks widespread doubt, I only need to analyze it once and keep the result. The extension can download a list of known AI-generated content and flags matches on the page, preserving user privacy. With this approach, I began building the Chrome extension.
I’ve built countless software projects, but this was my first Chrome extension. It was more challenging than expected, largely due to security constraints. Extensions operate in isolated sandbox environments, communicating via messaging with strict permission whitelisting to prevent malicious actions. I also learned some React Fiber tricks to extract the information needed for the extension. This topic deserves its own article, but today, I’ll focus on the machine learning aspects.
Building Internal Tools for Data Collection
With the extension built, I could send videos to my API server and store them in a database. To train the AI model, I needed labeled data. Reflecting on thousands of collected videos, I realized internal tools are critical but often overlooked. Efficient data handling depends on these tools, so I built an intuitive UI for labeling data to streamline the process.
Screenshot internal of CakeLens for viewing, labeling and editing submissions
Evolving the Model with Hyperparameter Gradient Descent
Building the extension and internal tools was straightforward compared to designing the model. The challenge was creating a model that generalizes pattern recognizing while balancing performance and cost. Ideally, I’d define an evaluation metric, and a genetic algorithm would evolve the model automatically. My previous MAZE project aimed for this, but it’s not mature enough and doesn’t cover CNNs, so I designed the model manually through trial and error.
My biggest initial mistake was not setting up infrastructure to collect metrics for objective model evaluation. I’d run data, review results, guess improvements, adjust, and repeat. Without sufficient data, progress was slow and guesses often wrong. I realized I was wasting time. Learning from this, I built infrastructure to collect metrics and systematically test approaches.
Model design involves many questions: How many CNN layers? What kernel size? What learning rate? Which modules to use? Without a systematic approach, it’s easy to get lost in the ocean of permutations. First, I tackled metric collection. I used tools like Grafana while I was wearing hat of a DevOps engineer or backend engineer, but for machine learning, TensorBoard is preferred. Its UI is tailored for ML training and testing data, so I updated my code to log TensorBoard metrics.
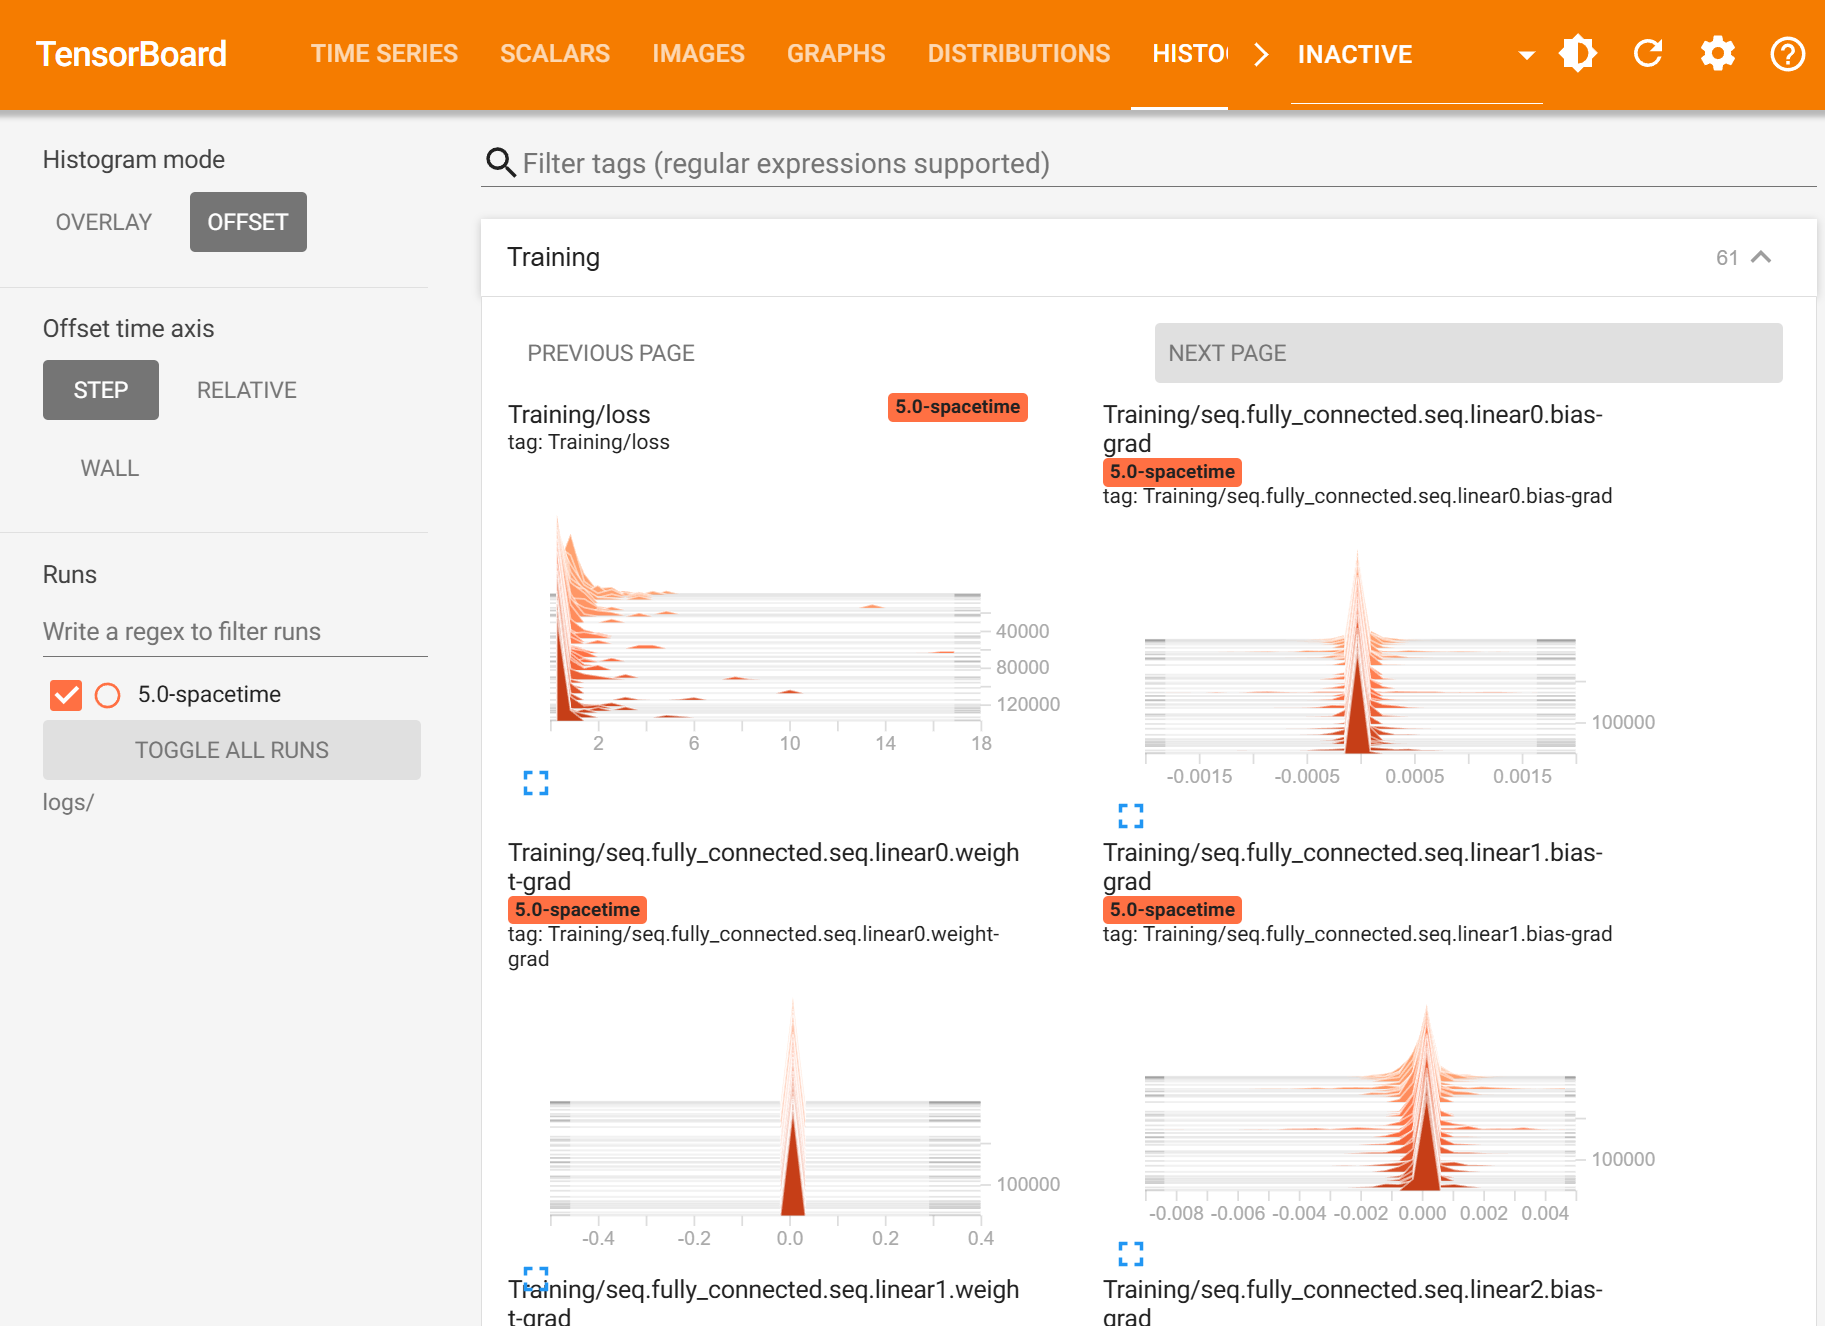
Screenshot of TensorBoard showing histogram of training gradients
Next, I needed a method to adjust hyperparameters systematically. I developed a technique I call “hyperparameter gradient descent.” Starting with a baseline model, I adjust one hyperparameter across a range, running limited epochs to compare results. I select the best performer, update the baseline, and train on the full dataset. Then, I analyze results, hypothesize improvements, and test new hyperparameters. This iterative process resembles gradient descent but at the hyperparameter level.

Diagram showing the approach moving from a model design, trying out with different hyperparameters, pick the best one and move to next baseline design.
For example, while training my models, I observed that they stop learning after some steps. By examining the gradient histogram on TensorBoard, I realized that the gradient distributions were consistently zero after a certain point. My theory was that high loss causes large gradients at the very beginning, which wipes out many neurons and weights, making them fall below the ReLU threshold (zero in this case) and preventing activation. It almost felt like a surge of current flowing into a circuit board, frying the electronic components. To address this problem, I experimented with different approaches using the current version of the model. First, I tried gradient clipping. This approach did help mitigate the initial gradient explosion issue. However, since gradient clipping requires accessing all gradient values, it significantly slows down training, making it less than ideal. Next, I tuned the learning rate. With my infrastructure, I can easily test the same model structure with different learning rates and evaluate their performance. This allowed me to quickly identify the optimal learning rate for the current model structure. I’m now on version 5 of my baseline model.
This approach has drawbacks. During exploration, choosing the number of epochs for experiments is challenging. Too few may miss potential benefits, while too many waste resources. With my limited budget, I could only test a few options, making educated guesses based on small data windows. With more resources, I recommend running at least one full epoch to uncover late improvements. Additionally, keep models flexible—parameterize layers, learning rates, kernel sizes, and structures as arguments rather than hard-coding values to simplify tuning.
Another issue with this approach is that previously determined parameters may not remain optimal after changing the model structure. For example, the optimal learning rate from the previous structure might not suit the new one. Therefore, you need to continuously ask questions and explore different directions to determine the best next move. Even when you believe you’re heading in the right direction, this may not always be true. It still requires significant trial and error. Sometimes, I had to revert to an earlier version and proceed from there because the new approach performed worse than expected.
Using Cloud Services Like Modal to Speed Up Experiments
While hyperparameter gradient descent was helpful, training on my Nvidia RTX 4090 slowed as models grew larger. My PC struggled, sometimes becoming unusable. Testing multiple hyperparameters sequentially was too time-consuming. I needed a cloud-based solution and found Modal, a container-based platform for GPU computing. As someone experienced with containers, I appreciated its approach. This article isn’t sponsored, but I recommend Modal for machine learning workloads due to its ease of use. Modal bills only for active container time and supports running multiple containers simultaneously, enabling parallel hyperparameter testing.
Here’s an sample code how to use Modal to explore different learning rate with the same training function:
import modal


MINUTES = 60
HOURS = 60 * MINUTES

app_name = "cakelens-v5.0"
app = modal.App(app_name)
base_image = modal.Image.from_dockerfile("./docker/modal/Dockerfile")
torch_image = base_image.pip_install(...)
volume = modal.Volume.from_name("cakelens-v5-volume", create_if_missing=True)
gpu = "H100"


@app.function(
    image=torch_image,
    volumes={volume_path: volume},
    cpu=(16, 32),
    gpu=gpu,
    timeout=16 * HOURS,
)
def train_model(node_rank: int, kwargs: dict):
    ...
    # train your model here


@app.local_entrypoint()
def main():
    base_kwargs = dict(
        limit_training=1000,
        epoches=1,
    )
    for result in train_model.starmap(
        [
            (
                0,
                base_kwargs
                | dict(
                    run_name="5.0-lr-3e-03",
                    learning_rate=3e-03,
                ),
            ),
            (
                1,
                base_kwargs
                | dict(
                    run_name="5.0-lr-5e-03",
                    learning_rate=5e-03,
                ),
            ),
            (
                2,
                base_kwargs
                | dict(
                    run_name="5.0-lr-7e-03",
                    learning_rate=7e-03,
                ),
            ),
        ]
    ):
        print(result)
Using Modal, I realized computing power is essential for ML. No matter how much theory you study, without resources to experiment, progress is limited. More computing power allows testing more approaches at scale, but the capital requirement is steep. The barrier to ML isn’t a PhD—it’s access to computing resources.
Maximizing GPU Usage Is Harder Than Expected
With Modal’s H100 GPUs, I expected fast training, but software challenges persisted. Even with powerful hardware, GPU usage wasn’t always 100%, sometimes much lower. Video decoding and data transfer from disk to GPU memory caused bottlenecks. Decoding videos takes time, and transferring data from main memory to GPU memory via CUDA streams (similar to coroutines) can idle the GPU if not optimized. To reduce waste, I enabled PyTorch DataLoader workers to load video data in parallel subprocesses. Profiling showed the GPU still waited for memory transfers.
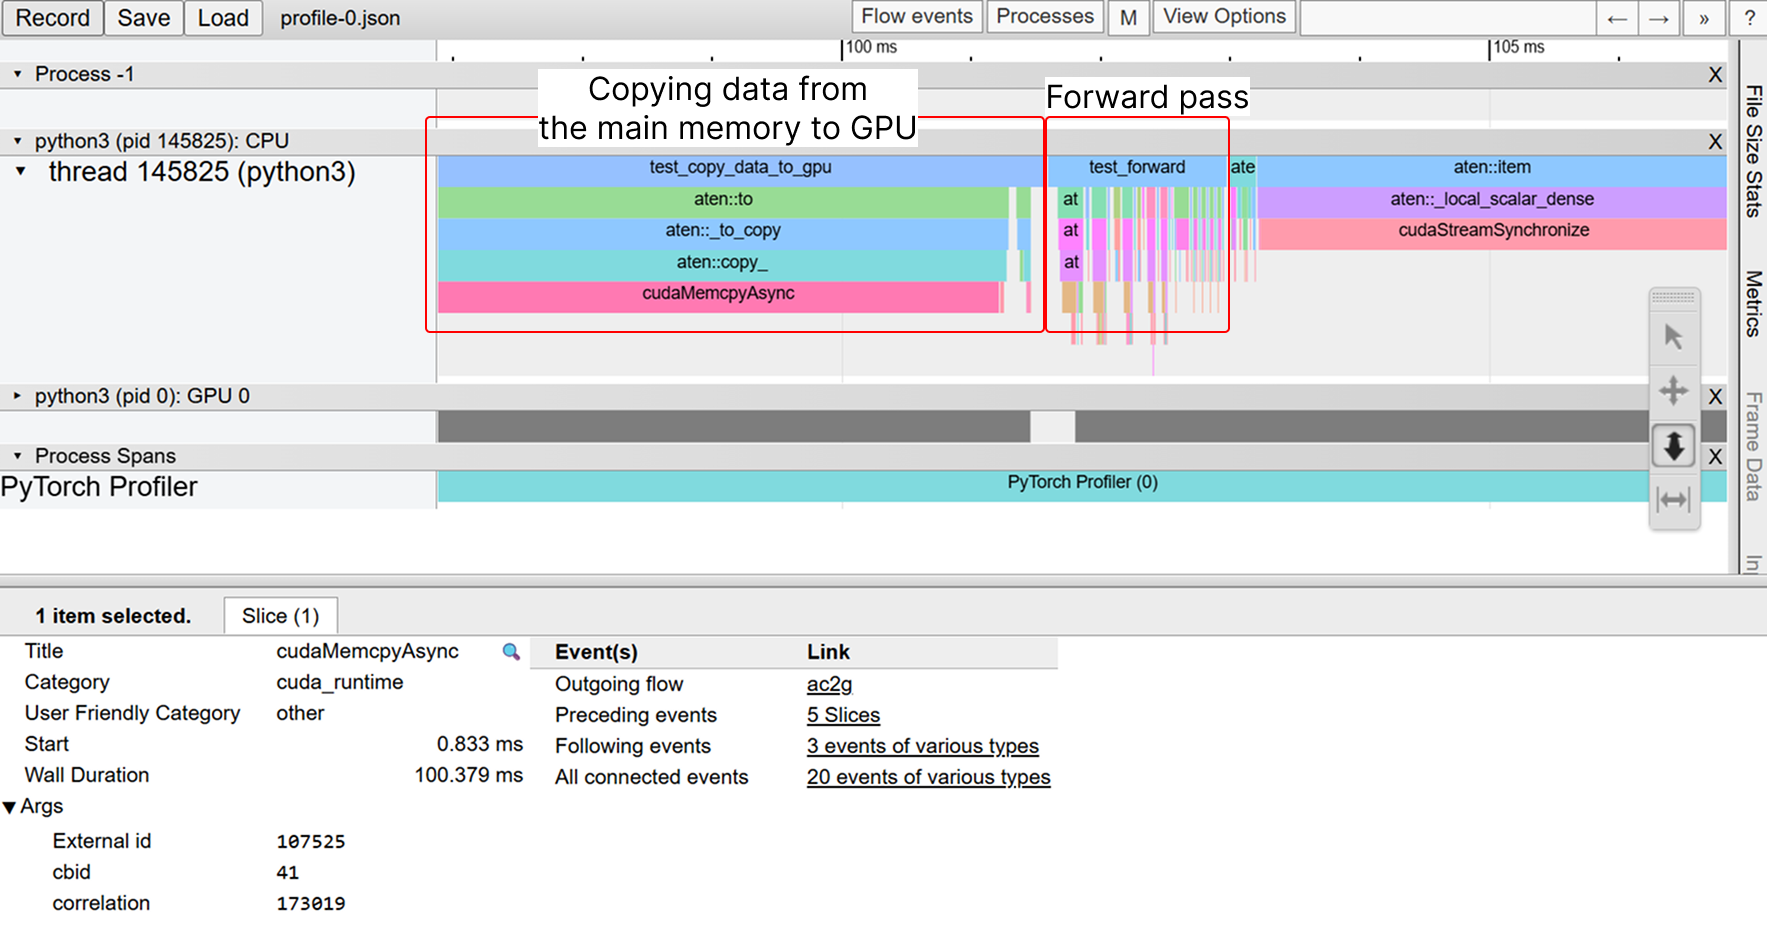
Screenshot of Chrome's profiler UI showing the forward pass waits for memory copying of the input data from the main memory to the GPU
This reminded me of CPU pipeline concepts. While the GPU waits for data, it could process the previous batch. I implemented a PyTorch CUDA stream generator to load data to GPU memory while processing the prior batch.
Here’s the generator code:
def cuda_preload(
    datasets: typing.Sequence[tuple[torch.Tensor, torch.Tensor]],
    device: str,
    worker_stream: torch.cuda.Stream | None = None,
) -> typing.Generator[tuple[torch.Tensor, torch.Tensor], None, None]:
    preload_stream = torch.cuda.Stream()
    if worker_stream is None:
        worker_stream = torch.cuda.default_stream(device)

    def _to_device(
        src: tuple[torch.Tensor, torch.Tensor]
        | tuple[torch.Tensor, torch.Tensor, dict],
    ) -> tuple[torch.Tensor, torch.Tensor]:
        src_x, src_y = src
        with torch.cuda.stream(preload_stream):
            x = src_x.to(device, non_blocking=True)
            y = src_y.to(device, non_blocking=True)
        x.record_stream(worker_stream)
        y.record_stream(worker_stream)
        return x, y

    iterator = iter(datasets)
    try:
        with record_function("preload_dataset"):
            previous = _to_device(next(iterator))
        while True:
            with record_function("load_dataset"):
                current = next(iterator)
            worker_stream.wait_stream(preload_stream)
            current = _to_device(current)
            yield previous
            previous = current
    except StopIteration:
        return
With that, you can then use it to wrap around the datasets in the training loop like this:
for x, y in cuda_preload(dataloader, device=device):
  logits = model(x)
  # ...
Now, loading data to the GPU and performing the forward pass happen simultaneously, which is much more efficient!
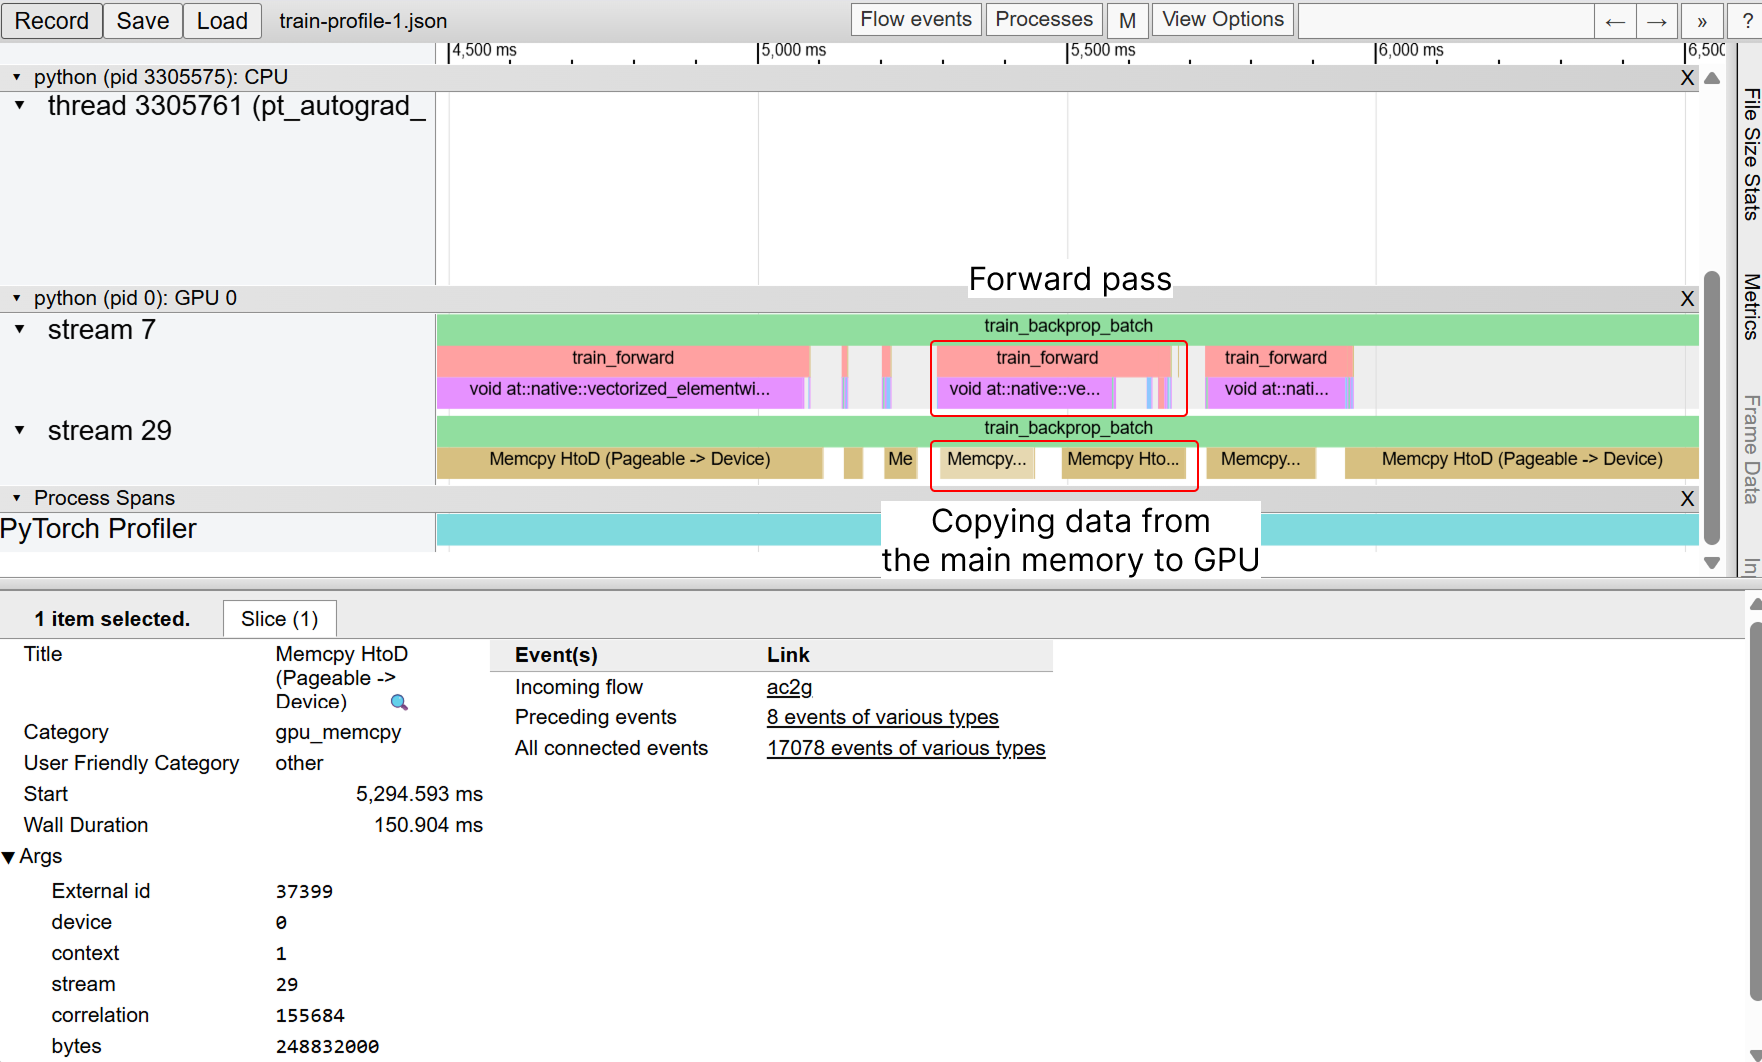
Screenshot of Chrome's profiler UI showing the forward pass runs in the same time as memory copying of the input data from the main memory to the GPU
This improved GPU usage, but transfers were still slow.
I learned pinning DataLoader memory as non-pageable speeds up transfers by avoiding an extra memory copy step.
In most cases, you can simply set pin_memory to True with your DataLoader to do it for you, like this:
train_dataloader = DataLoader(
    training_dataset,
    batch_size=batch_size,
    shuffle=True,
    num_workers=num_workers,
    pin_memory=True,
    pin_memory_device=device,
)
To summarize it up. Key lessons for maximizing GPU usage:
- Use DataLoader workers for parallel data loading in the background processes.
- Pipeline data loading and processing in an async manner.
- Pin memory for faster data transfers.
Reducing Memory Usage
As models grew, memory usage spiked, especially during backpropagation. I frequently encountered out-of-memory errors, even on H100 or A100-80GB GPUs. Without backpropagation, training would be faster and easier to distribute, and I’d love to eliminate it, but that’s an interesting research topic for another day.
To reduce memory usage, my first attempt was to decrease the mini-batch size. However, I didn’t want to lose the benefits of a larger batch size. Therefore, I performed multiple forward passes, calculated the average loss from those passes, and then executed a single backpropagation step.
However, that wasn’t enough. I also adopted Automatic Mixed Precision (AMP) in PyTorch, using FP16 with scaled gradients to reduce memory usage. Still, out-of-memory errors persisted. Distributed training across multiple GPUs was an option, but it’s complex and error-prone. While I know most mainstream LLM training is done distributively, there’s already too much for me to learn, and I don’t have the appetite for that today. Therefore, I’ve decided to treat the H100’s 80GB as the memory size limit for this project.
To further reduce memory usage, I adopted the checkpointing approach provided by PyTorch. Essentially, it avoids saving gradients during the forward pass, storing only the output values and recomputing gradients during backpropagation. In other words, it trades computation for memory. While this approach is slower, it allows training to proceed with just one H100 instead of two. By the way, the term “checkpoint” is confusing, as it’s often mistaken for saving the current model state 😅.
With the above measures, I successfully managed to keep memory usage in check and train my models.
Tips for Recognizing AI-Generated Videos with Human Eyes
While CakeLens helps identify AI-generated videos, learning to spot them manually is valuable. This is especially useful for labeling data, even with an AI model. Having reviewed thousands of AI-generated videos during data collection, I’d like to share some key tips.
Harry Potter Teleportation in the Bokeh
Many AI-generated videos feature people walking or objects moving in the background. In real videos, the camera focuses on the subject, leaving the background blurry—a phenomenon called bokeh. By closely examining moving objects in the bokeh, you’ll notice unnatural movements that don’t align with natural physics. Here’s an example of a person appears from no where in the background:
Yet another example of a person disappeared.
Example of a human body twisted unnaturely in the background:
Since these movements often feel unnatural, and sometimes the person or object even disappears, resembling the teleportation effects in Harry Potter films—hence the name.
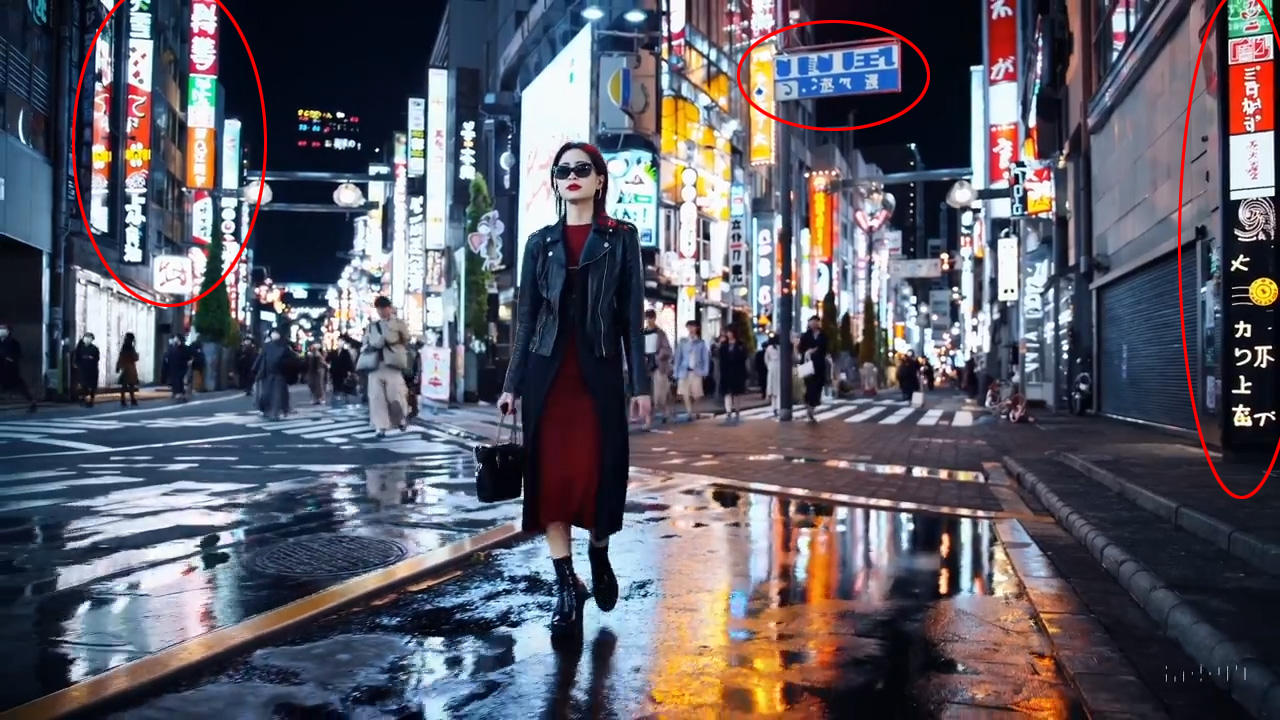
To identify AI-generated videos, look for unusual movements in the blurry background. This phenomenon occurs because mainstream video and image generation models rely on probabilities to determine what is most likely to appear in a given context. These models don’t fully understand objects; they generate what seems plausible. The fuzziness of bokeh or the limited pixels representing an object introduces great uncertainty, causing the model to produce inconsistent or unrealistic background movements. I didn’t observe this phenomenon in all AI-generated videos. However, when present, it’s a strong indicator that a video is AI-generated.
For most video-generating models to overcome this issue, they may need to change their generation approach. They likely need to enable the model to maintain a clear and continuous concept of scenes and actors within them, rather than guessing what should appear. At that point, it would be harder for us to detect flaws like these. This is yet another interesting topic to consider.
AI Fonts
Another telltale sign of AI-generated content is the text. As mentioned earlier, diffusion-based image and video generation models prioritize visual likelihood over meaning. They don’t comprehend text, often producing gibberish that mimics the appearance of text—mixed characters resembling Chinese, Japanese, or other languages without meaning. I call this “AI fonts.”
Here’s an example of AI fonts from OpenAI’s Sora:
Screenshot of AI-gen video with Sora posted by @gdb on X
The kangaroo video mentioned earlier also displays AI fonts on the ticket:
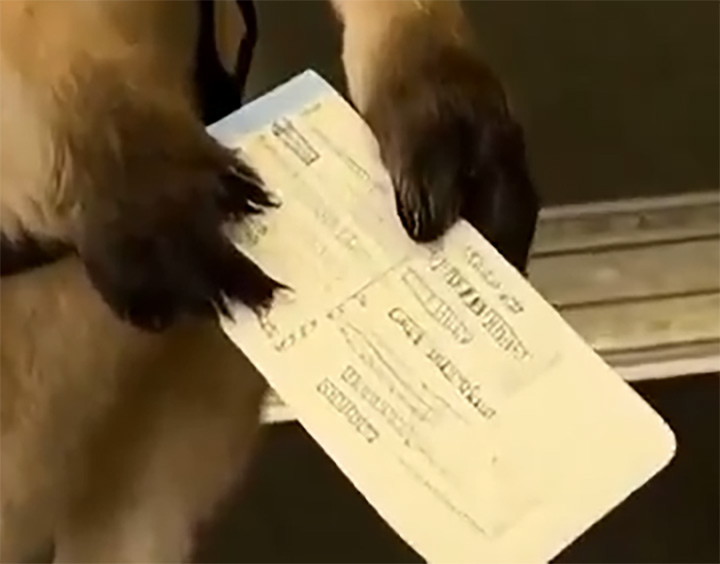
The text looks like text but not really.
Not all AI models struggle with text. Some, like OpenAI’s newer image-generation models, produce coherent text. So, while AI fonts can indicate AI-generated content, meaningful text doesn’t always rule it out.
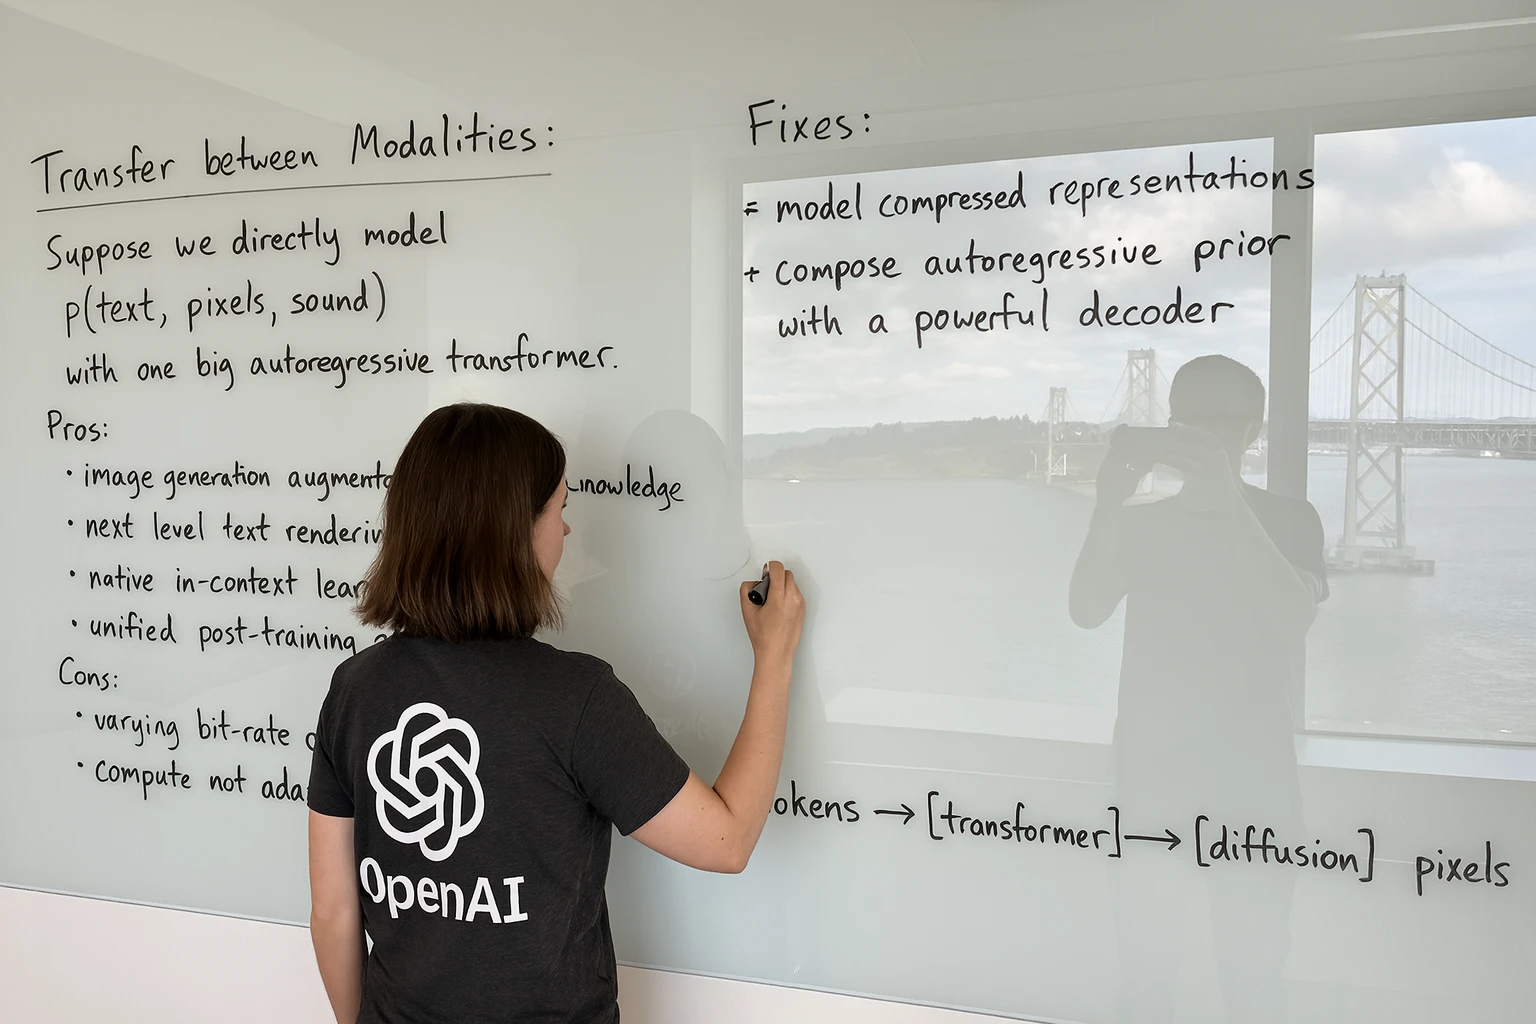
AI-gen image with OpenAI's new 4o model featuring a young lady writing text on a whiteboard with clear meaningful text on it
Incorrect Physical Behavior
AI-generated content sometimes exhibits incorrect physical behavior. Since diffusion models rely on probability, they may lack sufficient data to accurately predict physical movements. For example, in a Veo3-generated earthquake video, objects appear unnaturally light.
Yet another great example is an iPhone unboxing video:
Well, if you ever unbox an iPhone, you certainly know that’s not how you open the box.
Look for inconsistencies
Another tip for spotting AI-generated videos is to look for inconsistencies in the video. For example, some AI-generated videos may show a woman wearing blue nail polish. After certain movements, the nail might go out of view and then reappear, but it could change color, such as to red. The iPhone unboxing video in the previous section also exhibits inconsistencies. The man appears to be about to peel the protective film from the iPhone, but suddenly, the protective film’s handle turns into a piece of paper.
What’s Next?
With CakeLens now publicly available, what’s next? First, I want to improve its accuracy. As users submit more videos and additional data, I hope this will enhance the model’s performance. However, I’ve already spent a few thousand dollars on this project (hoping my wife doesn’t get upset about the bill 😅).
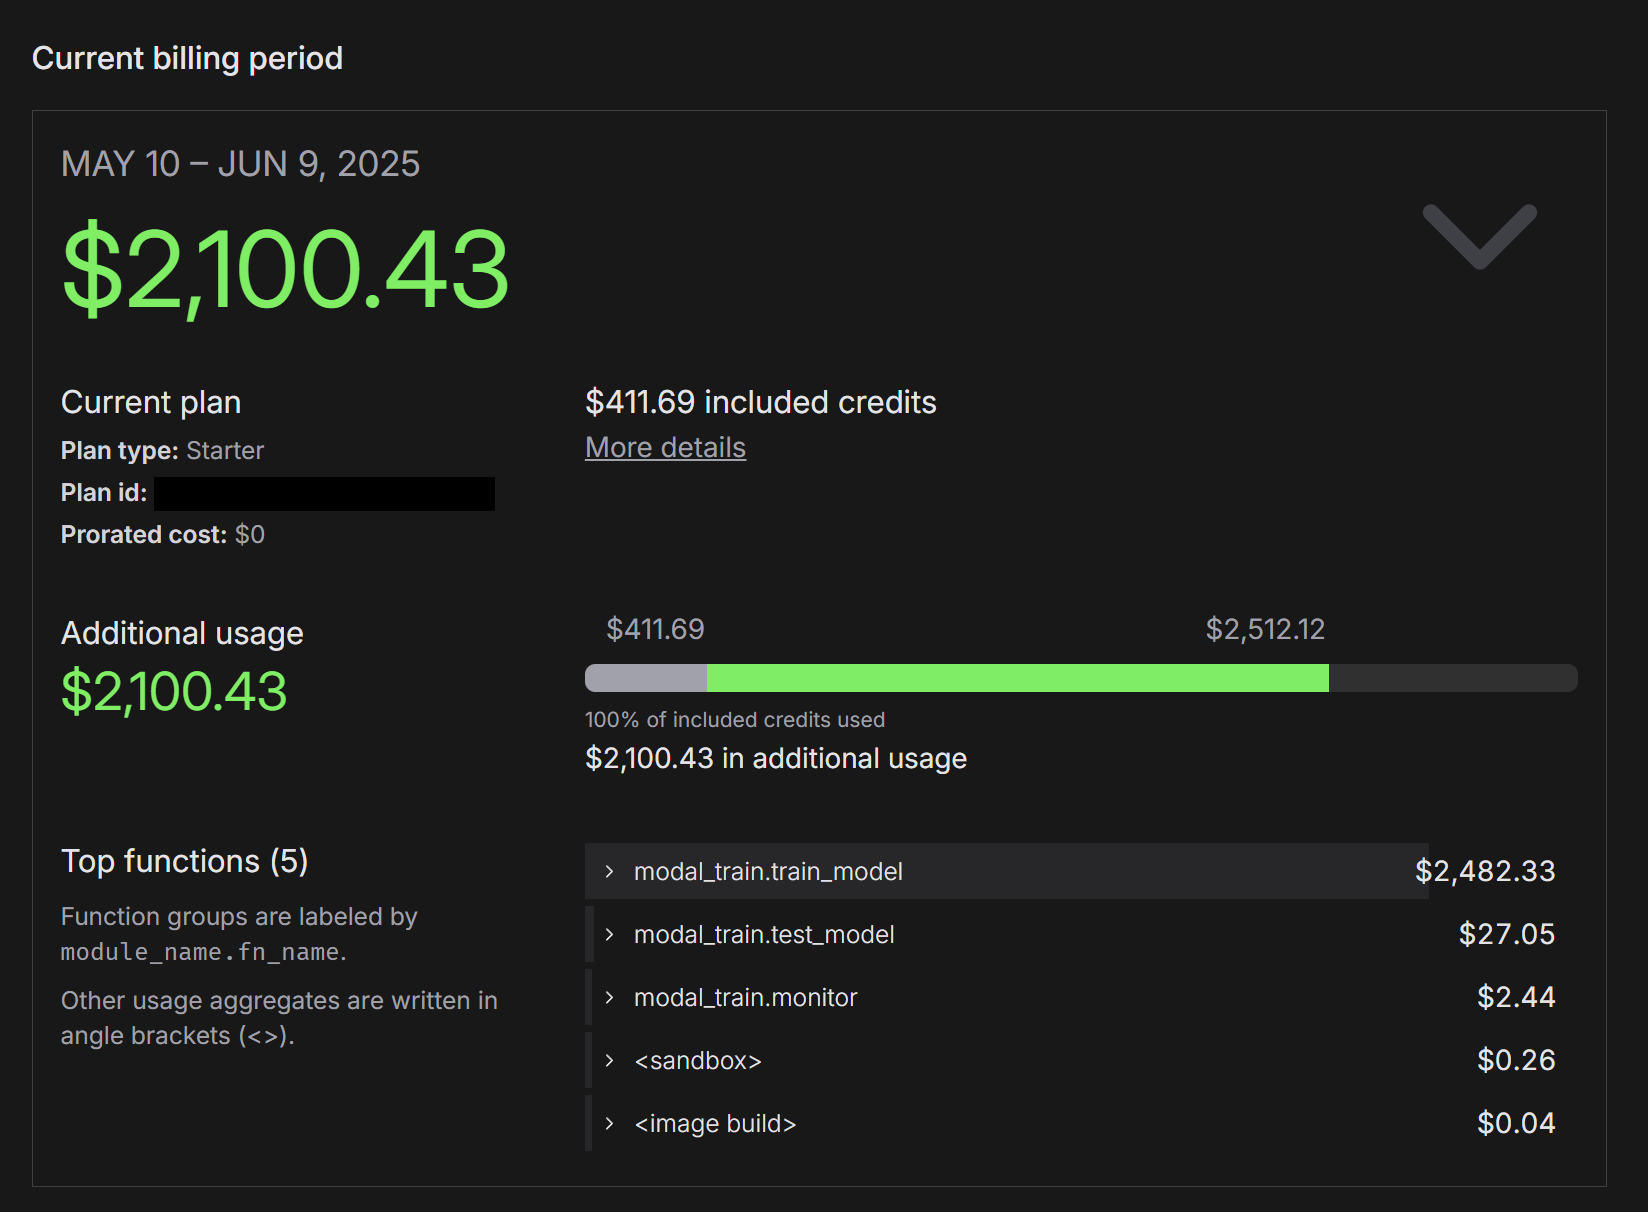
Screenshot of Modal's billing dashboard showing the total cost as $2.1K
That’s a bit expensive for a pet product, but I see it as tuition for learning machine learning. Moving forward, I’ll explore options for lower-cost local training, even if it’s slower.
Here are some ideas I’d like to pursue if time and budget permits:
Trying Different Approaches
My initial model detects subtle patterns in AI-generated video sequences. I’m curious about analyzing videos in the frequency domain. While the model could theoretically learn such transformations, it requires significant computing resources and complexity. Preprocessing images in the frequency domain might allow a simpler model to achieve similar results with fewer resources.
Bigger model
I’ve always wanted to explore the possibility of building a larger model, such as one with deeper CNN layers. However, my current model design is limited by computational resources. While I’m not sure if this is the rabbit hole I want to dive into right now, I’ll likely need to explore distributed training for a much larger model at some point. If I can get multiple instances running at a low cost, it might be worth the time to pursue.
Analyzing Audio
Currently, CakeLens doesn’t process audio. Previously, missing audio or audio that sounded off was a strong indicator of AI-generated videos. However, Google’s Veo3 now generates audio synced with visuals, making detection more challenging. Still, I believe analyzing both video and audio could be valuable.
Even though Veo3 can generate videos with synced audio, real-world sound has distinct characteristics influenced by factors such as the speaker’s skull shape (implied by their face), the surrounding environment, the microphone, and so on. If a connection can be made between visual cues and audio, a well-designed model with sufficient data might still be able to determine how the audio should sound.
However, this is challenging because videos may include music or unrelated soundtracks, or they may be heavily post-processed. When training the model to recognize AI-generated content using both image and audio, it will need to ignore the soundtrack if it’s unrelated to the visuals
Understanding How It Works
I assume my model detects AI-generated content by identifying subtle details—such as camera focus, distortion, or frequency domain patterns—that the human eye misses. However, I don’t fully understand what drives its decisions. To improve the model, I need tools to visualize what triggers a positive detection. This would clarify what works and guide next-generation designs.
Without this, it’s hard to pinpoint why the model flags content with confidence. Could it be detecting hidden watermarks embedded by AI generation models? Or is it associating specific logos, like TikTok’s, with non-AI content? Or does it flag content simply because certain objects appear more frequently in AI-generated videos? This is another intriguing area to explore.
Expanding Detection to Still Images and Audio
I focused on videos first because they contain more information, making detection easier. I’m considering training models for AI-generated images and audio. If videos have detectable patterns, images and audio likely do too. Solving this for images and audio would also enhance video detection.
Using Synthetic & Augmented Data
So far, I’ve relied on internet-sourced data for training, as generating AI videos is costly. If budget weren’t an issue, I’d explore synthetic data. For example, I could take a real video, extract a few key frames, feed them into a video generation model to predict the next few seconds, and compare the real and AI-generated videos. This would provide ground truth data versus the generated video, potentially helping the model learn AI-specific patterns.
Another idea is to extend the video data by applying slight transformations, such as cropping or slightly altering the color. I could also re-encode the video multiple times. Videos on the internet undergo various transformations by uploaders, and repeated re-encoding may cause the loss of critical details needed to determine if a video is AI-generated. Simulating these changes could help the model detect patterns more robustly.
Identifying the Source Model
When labeling AI-generated videos, I include the generating model if it’s mentioned in the post. I then built a model to predict which generating model was used. However, the model is currently too inaccurate to be useful. AI-generated videos are already scarce, and data for specific models is even sparser. Without significantly more samples, accurately identifying the source model remains challenging. A better approach might be to generate videos myself, but this would require substantial funding for video generation. This is unlikely to happen in the short term unless I have funds available to invest.
Implement Flagging
As mentioned previously, the browser extension should ideally flag AI-generated content automatically by downloading a list of known AI-generated content. This feature is not yet implemented. I may find time to build it at some point.
Final Thoughts
That’s it! I hope you enjoyed this article and learned something new. Building CakeLens was an incredible learning experience, and I’m glad I spent a month on this detour in my journey to build AGI. The knowledge gained was worth it. Machine learning simplifies many tasks, and innovations in generative AI have created new demands, such as detecting whether a video, image, or audio file is AI-generated. It’s an exciting time to explore these possibilities! Now that CakeLens is live, give it a try! If you don’t want to install the Chrome extension but want to analyze a video, at @CakeLens on X, and I’ll manually process it and reply the results below.
If you have feedback or questions about this project, leave a comment below or email me. Thanks for reading!