TinyRack - A 3D printable modular rack for mini servers
In my previous article, I’ve shared my journey of 3D printing and learning CAD from the perspective of a software engineer. As mentioned in the article, I really wanted to build a server rack for my bare metal Kubernetes cluster as seen in this article. Recently, I finally got some time to actually print some projects I have designed so far. Today, I am excited to introduce what I’ve built - TinyRack, a modular rack for mini servers!

TinyRack with my mini PC cluster
I imagine many people would enjoy a server rack designed specifically for mini servers, given how popular homelabs have become in recent years, so I share my models under an open license. You can download all the models from TinyRack.io and print them yourself, or you can also purchase them on the website.
...
Read the full articleContinual learning with the Marketplace algorithm: model learns new data through inference, not training
Have you ever wondered why machines need a dedicated training process while humans can learn from experience? I wondered the same thing for a long time. Today, I’d like to introduce continual learning with the Marketplace algorithm, which demonstrates the possibility of machines learning new things by simply doing!
This is the third article in the Marketplace algorithm series. Please read the first article and second article for details on the Marketplace algorithm. Last week, I published the second article, which discusses using all the probes to compose the best parameter delta. It was a lot of fun! 😄
However, training a model like a normal training process is not the most exciting application of the Marketplace algorithm. The previous articles were just appetizers; the main course is here. The most intriguing application of the Marketplace algorithm is continual learning. I had this idea almost immediately after developing the Marketplace algorithm. After running through the concept in my mind, I believed it was feasible. So, I spent a few days implementing it, and it worked! It still has a long way to go, but it already shows great potential.
The experiment’s design is straightforward. First, I trained the beautiful MNIST model from Tinygrad using the Marketplace V2 algorithm and the digits dataset for 2,000 steps, achieving 96% accuracy on the validation dataset. Next, I took the trained model, simulated the inference process, and added class 3 (dress) from the Fashion MNIST dataset, mixing these images with the digits dataset to allow the model to classify them.
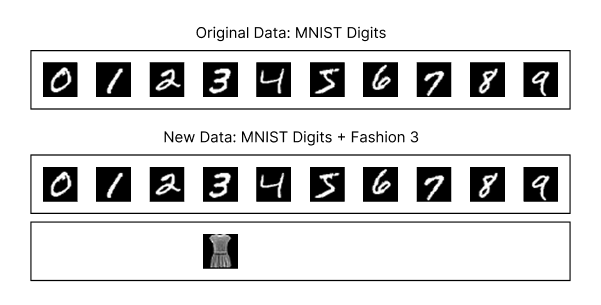
A diagram showing the original MNIST digits dataset and the new dataset, which combines the MNIST digits dataset with class 3 (dress) from the Fashion MNIST dataset.
I applied the Marketplace algorithm to enable the model to continually learn the new dress images gradually with each step. The goal was to determine whether the model could learn the new dress images primarily through inference, without dedicated training, while still classifying digits correctly most of the time to provide business value. Here’s the result:
As shown, the model gradually learns the new dress images over several steps while maintaining its ability to classify digits correctly most of the time. These steps involve only inference, with no dedicated training process!
The implications of this technology are tremendous. I believe the future of machine learning lies in learning rather than training. Companies that master this approach in production will gain a significant advantage because their models improve as more people use them, quickly and without much additional cost. As the model improves, it attracts more users, creating a flywheel effect: the more it’s used, the better it becomes. Best of all, this approach requires almost no additional computational cost for training. Of course, this is just a proof of concept, and there are still many improvements to make and challenges to overcome. Nevertheless, I’m thrilled about the possibilities of continual learning. Today, I’m excited to share my first take on continual learning with the Marketplace algorithm.
...
Read the full articleMarketplace V2 is all you need: A training algorithm on par with backprop that needs only forward pass
Update: Third article is here, Continual Learning with Marketplace: Model Learns New Data with Mostly Inference
Two weeks ago, I published an article, Marketplace: My first attempt at training without backprop on GPU efficiently. To my surprise, it received far more positive feedback than I expected. I was thrilled that people found my research project interesting, and I greatly appreciate the kind words from readers.
Curious about how far I could push this idea, I spent another two weeks improving it. Initially, my research focused on enhancing the scalability of the Marketplace algorithm. I implemented seed-based random number generation for each vendor’s weights, as mentioned in the previous article. I also explored other ideas to improve the Marketplace algorithm, such as using a second forward pass to determine the optimal learning rate. However, exploring permutations of the loss outputs to compose a better overall delta, accounting for both good and bad outcomes, truly blew my mind 🤯.
The performance is now on par with backpropagation in certain configurations. Here’s the comparison with backpropagation plus Stochastic Gradient Descent (SGD) as the optimizer:

A diagram with 50% smoothing shows the comparison of the validation accuracy between the Marketplace V2, V1 algorithms and the backprop with SGD as the optimizer based on different learning rates. The Marketplace V2 algorithm outperforms the Marketplace V1 algorithm greatly and the backprop with SGD as the optimizer at 1e-3 learning rate. It only lose to the backprop with SGD as the optimizer at 3e-3 learning rate and 7e-3 learning rate. While backprop with SGD as the optimizer is still better, but I believe with hyperparameter tuning, the Marketplace V2 algorithm can at least match it.

A diagram with 50% smoothing shows the comparison of the loss between the Marketplace V2, V1 algorithms and the backprop with SGD as the optimizer based on different learning rates. The Marketplace V2 algorithm outperforms the Marketplace V1 algorithm greatly and the backprop with SGD as the optimizer at 1e-3 learning rate and 3e-3 learning rate in later steps. It only lose to the backprop with SGD as the optimizer at 7e-3 learning rate. While backprop with SGD as the optimizer is still better, but I believe with hyperparameter tuning, the Marketplace V2 algorithm can at least match it.
I believe my research has a significant potential to revolutionize the machine learning training process. Today, I’m excited to share the improvements to the Marketplace algorithm, which I call the Marketplace V2 algorithm.
...
Read the full articleMarketplace: my first attempt at training without backprop on GPU efficiently
Update: Please read the second article for the details of the V2 algorithm. Also the third article, Continual Learning with Marketplace: Model Learns New Data with Mostly Inference, introduces the continual learning with the Marketplace algorithm.
If you’ve read my previous articles, you know I’m a big fan of first-principles thinking. I’ve mentioned many times that I want to eliminate backpropagation. Many people think I’m crazy and assume I must be joking. But no, I’m serious. I thought about the problem from time to time. Recently, I came up with an idea that could potentially work. I spent two weeks implementing it and running experiments, and it worked! While this is just a baby step, there are still many things to improve, but at least I think it’s an interesting idea that could be worth exploring and sharing. Today, I would like to share my approach to training without backpropagation on GPUs efficiently.

A diagram shows the validation accuracy of a small MNIST CNN model training process without using backpropagation.

A diagram shows the loss of a small MNIST CNN model training process without using backpropagation.
...
Read the full article